Hi all,
Let's see the Changes in Excel Buffer Table in NAV 2013 as compared to NAV 2009.
1. As automation are discountinued in NAV 2013, Microsoft have created a DLL for Excel Operations.
2. A new field added in Table "Cell Type", used to specifying type of field.

3. Based on the option selected the exported sheet will have the formatting.
4. The Functions have been Changed and also some functions have changed parameter.
5. A New Function which will be used in every report that is exported to Excel is - "CreateBookAndOpenExcel".
6. The Function will itself create Excel File on Service Tier, Download the File to Temp Path on Client and Open the File For User.
Let's see what changes we need to do in a export to excel report created in NAV 2009 or Previous Version to use in NAV 2013.
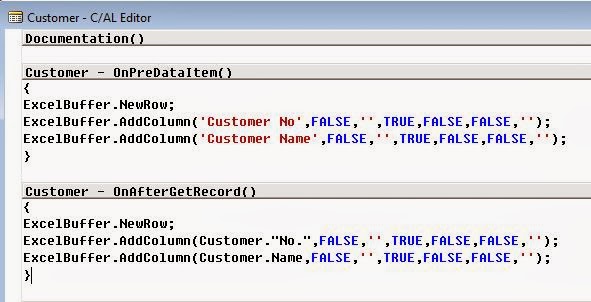
we have a sample report in NAV 2009 Which we used for Demo about how to export in Excel. Below is the code written on Report.
OnReportTriggers -

OnDataItem -

Now i will try to import the report in NAV 2013 and try to upgrade or compile report.
When you try to upgrade report, the error will come that you need to compile Report, But when you try to compile Report we get below error message.

The error is due to Code written to Export to Excel.
Resolution -
1. IN NAV 2009 just comment all the code Related to Export to Excel.

2. Export objects from 2009 and import it in NAV 2013.
3. Compile the Report and upgrade it (From Tools Menu - Upgrade Report).
4. Once Upgraded Change the Functions as shown below -
Specify the new field which adding column, i have also added some new fields just to show you.

Comment all code in OnPostReport and replace with single line.
ExcelBuffer.CreateBookAndOpenExcel(SheetName,ReportHeader,CompanyName,UserID2)

Save the Report and Run it.
Conclusion -
Two Major Changes in Excel Buffer.
a) One more paramerter added on AddColumn Function i.e Cell Type.
b) Only Function need to call for creating sheet and opening it is created.
There are other changes also done which will be based on requirment.
In Next post we will see how to auto save a Export to Excel Report in a specified path in the setup.
Regards,
Saurav Dhyani
www.sauravdhyani.com
Let's see the Changes in Excel Buffer Table in NAV 2013 as compared to NAV 2009.
1. As automation are discountinued in NAV 2013, Microsoft have created a DLL for Excel Operations.
2. A new field added in Table "Cell Type", used to specifying type of field.
3. Based on the option selected the exported sheet will have the formatting.
4. The Functions have been Changed and also some functions have changed parameter.
5. A New Function which will be used in every report that is exported to Excel is - "CreateBookAndOpenExcel".
6. The Function will itself create Excel File on Service Tier, Download the File to Temp Path on Client and Open the File For User.
Let's see what changes we need to do in a export to excel report created in NAV 2009 or Previous Version to use in NAV 2013.
we have a sample report in NAV 2009 Which we used for Demo about how to export in Excel. Below is the code written on Report.
OnReportTriggers -
OnDataItem -
Now i will try to import the report in NAV 2013 and try to upgrade or compile report.
When you try to upgrade report, the error will come that you need to compile Report, But when you try to compile Report we get below error message.
The error is due to Code written to Export to Excel.
Resolution -
1. IN NAV 2009 just comment all the code Related to Export to Excel.
2. Export objects from 2009 and import it in NAV 2013.
3. Compile the Report and upgrade it (From Tools Menu - Upgrade Report).
4. Once Upgraded Change the Functions as shown below -
Specify the new field which adding column, i have also added some new fields just to show you.
Comment all code in OnPostReport and replace with single line.
ExcelBuffer.CreateBookAndOpenExcel(SheetName,ReportHeader,CompanyName,UserID2)
Save the Report and Run it.
Conclusion -
Two Major Changes in Excel Buffer.
a) One more paramerter added on AddColumn Function i.e Cell Type.
b) Only Function need to call for creating sheet and opening it is created.
There are other changes also done which will be based on requirment.
In Next post we will see how to auto save a Export to Excel Report in a specified path in the setup.
Regards,
Saurav Dhyani
www.sauravdhyani.com
Hi I am using
ReplyDeleteExcelBuf.AddColumn("Value Entry"."Sales Amount (Actual)",FALSE,'',FALSE,FALSE,False,'',ExcelBuf."Cell Type"::Number);
in Nav2018. Everything works well except I don't get any 1000 separator in my numbers. Is there any way to format the cell type?
Thanks
Just use - ExcelBuf.AddColumn("Value Entry"."Sales Amount (Actual)",FALSE,'',FALSE,FALSE,False,'#,##0.00',ExcelBuf."Cell Type"::Number);
DeleteHi I'm using nav 2017 i have a problem how to define report header(row no 1 and column no 7)
ReplyDeleteHi Vishal,
DeletePlease follow steps as listed in Step 4. For each column create a new row as listed in above screenshot.