
#msdyn365bc - Export Multiple Sheet To Excel Report.

Hi Readers,

This is one of the question that I received as comment to Previous article.

In this article we will develop a report which can extract data from multiple Tables.

I am not going into details as its already discussed in last article. You can refer that article here.

For Demo, I will be export few fields from customer & vendor table to Excel.

Let's start by creating a New Processing Only Report for Exporting Data to Excel.

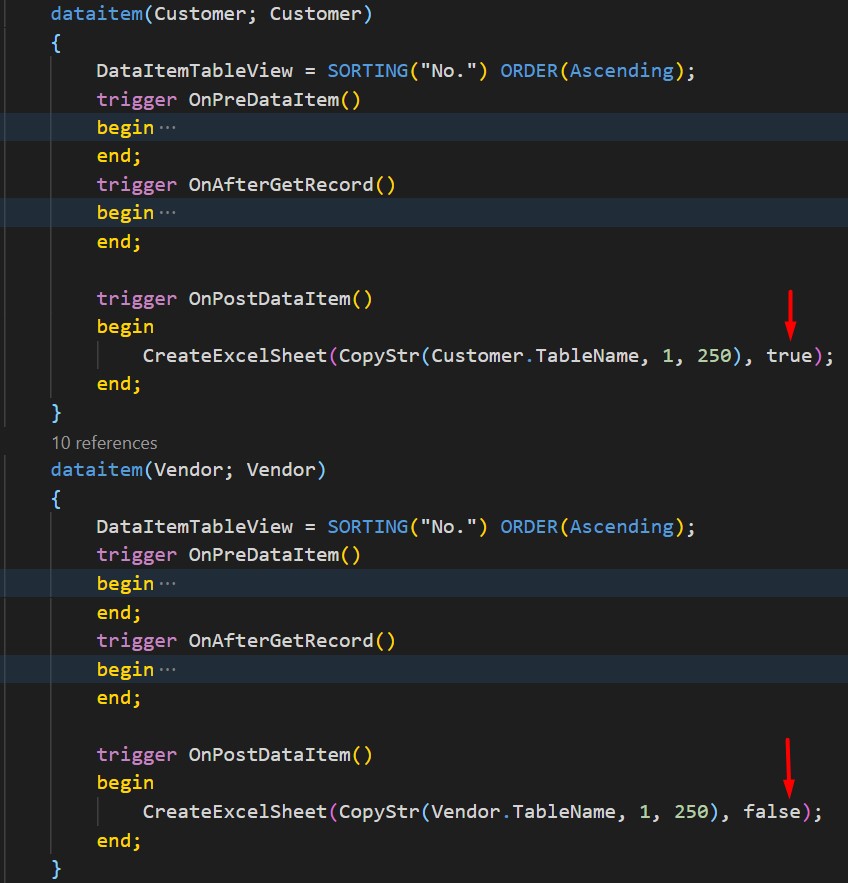
Next we will add two data items Customers and Vendors. Both Data Item will call function to Create Excel Header and Excel Body.


Below are the function, which are referenced in data items for Generating Excel Header.

Next is the set of Functions to Generate Excel Body.

To Add Multiple Sheet, I will change CreateExcelBook Function and also Add New Function CreateExcelSheet.

CreateExcelSheet - will require two parameters - 

  • SheetName - This parameter will have the Sheet Name in Excel File.
  • NewBook - Boolean. Based on this Boolean a New Book will be Created.  When this function will be called from first  Dataitem it will be set to true and for all other data items it will be set as false.   
CreateExcelBook, will remove other code lines to create Book and Write Sheet. And will only have code to CloseBook and Open Excel.

In the End, You can call this new function from OnPostData Item of all data items in reports.

Let's Publish and Run the Report and see data in Excel.


Hope you like the article. Let me know your views in article comments.

You can also download the source code from GitHub.

Stay Connected and keep suggesting what you would like me to write about.

Regards,
Saurav Dhyani
www.sauravdhyani.com

Comments

Popular posts from this blog

BC 21 and Higher - PowerShell Cmdlet (Replacement of Business Central Administration).

Hi Readers, As discussed in last article about deprecating of Business Central Administration, there are few common actions that we use in administration till Business Central 20. For our on-prem customers, we will still require doing activities. As Microsoft suggest we need to start using PowerShell cmdlet.    Let's see how to do those via PowerShell, or Administration Shell. I will be keep adding commands as you comment to this article.

Send Mail with Attachment From Navision.

Hi all, We have seen how to save a report into PDF and how to send mail to a customer. Let's link these two post in one i.e. Mailing statement to a customer into PDF Format. This article is part of the Series. Please Refer  Table of Content here . If you have the old objects set let me brief you what I will be changing - 

MSDYN365BC - Data Upgrade To Microsoft Dynamics 365 Business Central on premises.

Hi Readers, We have already talked about the number of steps for upgrading to Business Central on Premises from different NAV versions. After that article, I received multiple requests for an article which list down steps for Data Migration. In this article, we will discuss steps of data migration to MSDYN365BC (on-Prem) from NAV 2017. For this article, I am considering a Cronus Demo Database without any customization. For an actual upgrade project, we will have to complete object merge using compare and Merge process. After the Merge Process, the next step is data migration. Let's discuss those steps. Direct Upgrade to Microsoft Dynamics 365 Business Central (on-Prem) is from following versions - 1. NAV 2015. 2. NAV 2016. 3. NAV 2017. 4. NAV 2018.