
This is one of the common question that I keep on skipping for a while to write an article about how to export data in Business Central.
The Process is similar but during the Upgrade or writing code we kind of used a function C/AL World CreateBookAndOpenExcel which is not supported with Business Central.
The type or method 'CreateBookAndOpenExcel' cannot be used for 'Extension' development.AL(AL0296)

In this article we will try to understand the whole export to excel process and find a replacement for CreateBookAndOpenExcel in SaaS World.
You can still use this function on-Prem by changing "target": "OnPrem" in your app.json.
But I always feel that my solutions should be similar for on-Prem and SaaS as customer can opt to upgrade to SaaS.
For Demo, I will be export few fields from item table to Excel.
Let's start by creating a New Processing Only Report for Exporting Data to Excel.
Use snippet treport to get an skeleton of Report. set basic property of Report as shown below and also add a new data item in Report for Item Table.

Next we want to create Headers for our Excel File.
- Create a temporary variable for Excel Buffer.
- Clear Temp Variable in onInit Report Trigger.
- Add a method to create Excel Header with name - CreateExcelHeader.
To add Data in Excel Columns, Excel Buffer Provides a Method AddColumn which Requires Following Parameters -
- Value - Value you want to Export.
- IsFormula - If You are using a formula instead of value.
- CommentText - If you want to add Comments to Column added in Excel File.
- IsBold - Make Text Bold in Excel.
- IsItalics - Make Text Italics in Excel.
- IsUnderline - Make Cell Value as Underline in Excel.
- NumFormat - If you want to use Custom Formatting in Excel.
- CellType - It will use default formatting in excel for - Date, Number, Text and Time.
So Let's add Header and Instead for Fix Text, I am planning to use Field Captions for Excel Header as shown below. We will call it onPreDataItem of our Data Item.

Now as we have headers ready, lets try to add records into excel file.
- For this we will add a new method with Name - CreateExcelBody.
- As we have already added a row and we want to print our data after one line, we will call Excel Buffer Method to Add New Row.
- We will call this method from Onaftergetrecord of our Dataitem.
- This method will also use the Add column function from Excel Buffer but, I am planning to export a Flowfield "Inventory".
As we all understand that Flowfield are virtual and need to calculated before we plan to use them you can either use the legacy way of using calcfields which is slower or you can use the new faster way to call SetAutoCalcfields.
The Cool part is that you don't need to call SetAutoCalcfields in Onaftergetrecord, you can just call it in onPreDataItem and it will calculate value for the Flowfield, As shown below.

Once we are ready with Excel Header and Body, lets call a method to save our excel file.
- We will write a new method to Generate Excel Book with name - CreateExcelBook.
- We will call it an the end of Report that is OnPostReport trigger.
In this method instead of using CreateBookandSaveExcel, we will use -
- CreateNewBook - Which will create a New Excel Book.
- WriteSheet - Write Data in Excel Sheet in New Book.
- CloseBook - As Writing is complete we will close the book.
- SetFriendlyFilename - Optional to provide a valid Name to Excel File.
- OpenExcel -
OpensDownloads the Excel File for user.

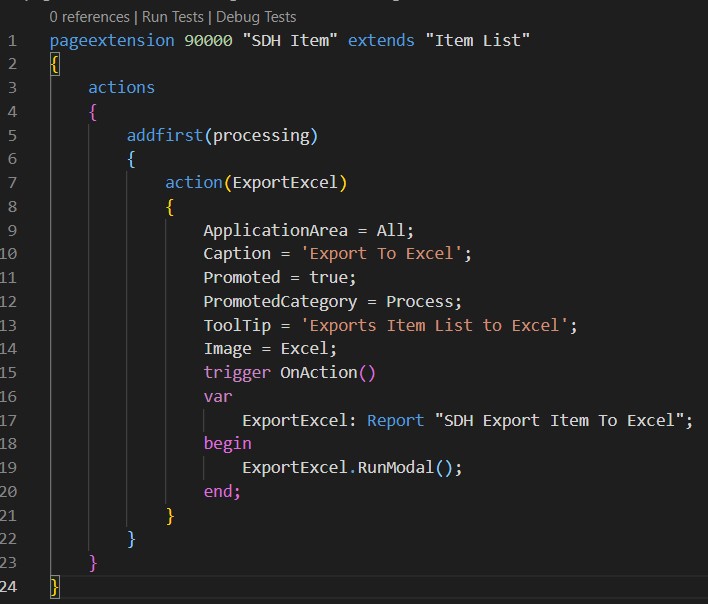
Once we are done with all our changes, lets map this report to Item List page using Page Extension.
Let's publish our app and test the Report.

Hope you like the article. Let me know your views in article comments.
You can also download the source code from GitHub.
Stay Connected and keep suggesting what you would like me to write about.
Just an addition to it, can you please provide some sort of code or guidance on how to attach this Excel Buffer generated Excel Report to Email and send that to with New Email functionality.
ReplyDeleteGreat Idea,
DeleteI will try to write an article when I have some time.
Watch this - https://youtu.be/18IRBkfEG54
Delete