I am writing an article after a long time.
There are multiple reasons behind that. I am busy with projects and I am spending more time in #bcopendiscussion.
If you are not part of #bcopendiscussion or are unable to join due to overlapping schedule I would recommend you to visit YouTube for all session recordings.
This article is based on a request from one of our community member, which talks about Export data to Excel in Business Central 14. So if you know it please save your time.
There are changes in functions related to Export to Excel feature. In this article, we will try to list down methods required to export data to excel using Excel Buffer.
For Demo, let's assume we would like to Export data from Customer Table with associated open customer ledger entries if exist.
Let's create a Report 50000 & and add two data Items Customer & Cust. Ledger Entries. Add Relation to Cust. Ledger Entries based on Customer No. using property DataItemLink as shown below.
If you would like to filter records then apply filter on data items that you would like. We will apply the Filter in Customer Ledger Entries using property DataItemTableView.
For Exporting Data using Excel Buffer, create a global variable TempExcelBuffer which should always be set to Temporary as shown below.
Lets Define five Functions to -
- WriteExcelHeader - Function to write Headers in Excel File.
- WriteCustomerExcelBody - Write Data From Customer Record.
- WriteCustomerLedgerExcelBody - Write Data from Customer Ledger Entries.
- WriteReportInfo - Optional if you want to add information tab with additional information.
- WriteExcelBook - Function to Close and Open Excel Book.
The Function that is used to write data into excel buffer is AddColumn which requires following parameters -
- Value - Pass the value that you want to print in Excel.
- IsFormula - If the Value passed is a Excel Formula then set it to True.
- CommentText - If you would like to add excel comment then pass a text.
- IsBold - If you would like to set the column Text to be Bold.
- IsItalics - If you would like to set the column Text to be Italics.
- IsUnderline - If you would like to set the column Text to be Underline.
- NumFormat - If you would like to set the column with a Number formatting.
- CellType - This parameter set the Cell Type in Excel, Options are - Text, Date, Time, Number.
- In this function we would like to add headers in Excel. I am using Field Captions for fields in Customer Table, but you can also use fixed text if required.
- The Headers will be Bold and Underline and That's why Parameter 4 and 6 are set to True.
- To add a New Row after every record, you will require to call function NewRow. Then using AddColumn you can add data into the Excel Buffer Table.
- If you would like to add a Flowfield from a table in Excel Buffer you will require to call the calcfields to calculate the value before we write in Excel Buffer.
- To Distinguish customer Ledger Entry Records, We are keeping first column as blank and Text will be italics (parameter 5 is set to True).
- Additionally there are numeric and Date field, so last field is set appropriately based on Value passed.
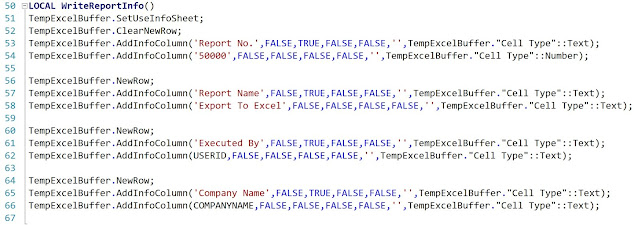
- This is optional function. If you would like to add Information about report, like Report No, Name and user who ran it then you can add details in this function.
- To Add Additional Sheet, Call function SetUseInfoSheet and instead of AddColumn use AddInfoColumn.
- This function is created to Save and Open Excel File as shown below.


Can you please help or provide some guidance for using Excel Buffer on BC OnCloud specifically Exporting Data and attaching it to Email with New Email functionality. I am not able to attach Excel and send through Email using Excel Buffer.
ReplyDeleteSure will do that.
DeleteSir, Very Nice Example, Its really helped me, and sir please elaborate about filtering in it, location wise, entry type wise etc.. :)
ReplyDeleteYou can add fields in ReqFilterFields property of Data Item and user will be able to filter records before running the report.
Delete