Hi Readers,
 As most of us were aware of it that Microsoft has released Preview Sandbox for Business Central SaaS Environment.
So if you are using Business Central (SaaS) its time to setup your Preview container to Test your Per-Tenant Extensions.
If there are issues in those Per-Tenant Extensions it will provide a good time frame to fix and test those extensions before actual release is available for SaaS Tenants.
If you are a partner then its time to start testing extensions on Preview Build.
This article will talk about the steps of How to Setup Preview Sandbox?
Step 1 - Check Current Version.
Open Help and Support From Client and Check Version of the Tenant.
As in the below screenshot, you can see that Version is 15.

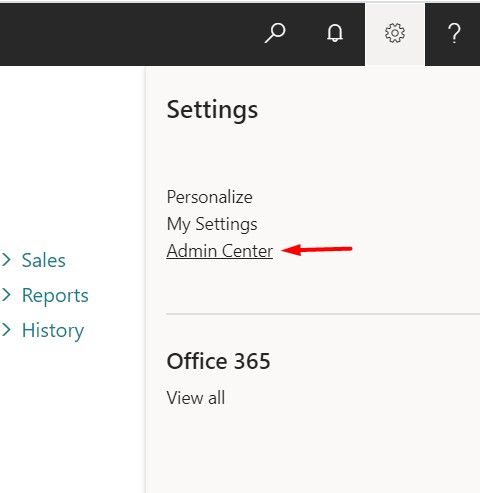
Step 2 - Open Admin Center.
Click on Setting Gear Icon and select the Admin Center.

Step 3 - Click New in Admin Center, and Provide Following Values for Parameters -

Step 4 - Choose yes in Confirmation Message.
Confirmation is - That environment may be updated to a new Preview Version or deleted with or without notice.
** This statement only applies to Preview Sandbox.

Step 5 - Sandbox State will be in Preparing.
As we confirm the confirmation message, Sandbox will start Preparing to setup the environment.

Step 5 - Sandbox Is Ready.
After a while, the State of the new tenant will change to Active and accessible now.

Step 6 - Let's check Version again.
Using Help & Support Menu check version of Sandbox Environment.
Sandbox is updated to Business central 16.0

Sandbox Environment is ready to use for test per-tenant extension and train your team about what's coming new in Next Wave.
How you find the information useful. Please share your feedback as a comment on the article.
#IWishItWasApril
Regards,
Saurav Dhyani
www.sauravdhyani.com
 As most of us were aware of it that Microsoft has released Preview Sandbox for Business Central SaaS Environment.
So if you are using Business Central (SaaS) its time to setup your Preview container to Test your Per-Tenant Extensions.
If there are issues in those Per-Tenant Extensions it will provide a good time frame to fix and test those extensions before actual release is available for SaaS Tenants.
If you are a partner then its time to start testing extensions on Preview Build.
This article will talk about the steps of How to Setup Preview Sandbox?
Step 1 - Check Current Version.
Open Help and Support From Client and Check Version of the Tenant.
As in the below screenshot, you can see that Version is 15.

Step 2 - Open Admin Center.
Click on Setting Gear Icon and select the Admin Center.
Step 3 - Click New in Admin Center, and Provide Following Values for Parameters -
- Environment Name - Name of Sandbox Environment.
- Type - Sandbox.
- Country - As per customer.
- Select a Version for this environment - Choose 16.0.11209.0(Preview)

Step 4 - Choose yes in Confirmation Message.
Confirmation is - That environment may be updated to a new Preview Version or deleted with or without notice.
** This statement only applies to Preview Sandbox.

Step 5 - Sandbox State will be in Preparing.
As we confirm the confirmation message, Sandbox will start Preparing to setup the environment.

Step 5 - Sandbox Is Ready.
After a while, the State of the new tenant will change to Active and accessible now.

Step 6 - Let's check Version again.
Using Help & Support Menu check version of Sandbox Environment.
Sandbox is updated to Business central 16.0

Sandbox Environment is ready to use for test per-tenant extension and train your team about what's coming new in Next Wave.
How you find the information useful. Please share your feedback as a comment on the article.
#IWishItWasApril
Regards,
Saurav Dhyani
www.sauravdhyani.com
IN kab aayega Dada?
ReplyDeleteNo Idea Dada.
Delete