Hi Readers,

In this article, we will discuss Upgrading a database to Business Central Wave 2 from Business Central Spring 2019 Release (14.x).
This all is for a Business Central Spring Database that does not include any C/AL Code Customization. The database can only include Third Party and Custom Extensions.
With this upgrade, we will replace the C/AL base application with a new Business Central 2019 release Wave 2 base application extension.
Prerequisite - Upgrade to Business Central Spring 2019 Cumulative Update 4 (version 14.5). If your current deployment is less than Cumulative Update 4 (14.x) then Upgrade to CU 04.
My Database (used for this article) has 4 Custom Extensions as shown below.

Task 1: Install Business Central version 15.
Before Installing Version 15, create desktop shortcuts to version 14.0 tools, such as Business central Server Administration tool, Administration Shell and Development Environment. After Installing Business Central 15 all these icons will be replaced with new version icons.
Then Install Business Central 15. Refer Here.
Task 2: Prepare the version 14 application and tenant databases for an upgrade.
1. Take a Full backup of the database.
2. Uninstall all extensions from the database either using PowerShell or Administration Shell.
Get-NAVAppInfo -ServerInstance <<ServiceName>> | % { Uninstall-NAVApp -ServerInstance BC140 -Name $_.Name -Version $_.Version}
** Replace <<ServiceName>> with Server Name.

3. Check Extension Management Page to Verify All Extensions are uninstalled.

4. Un-publish all systems, tests, and application symbols from the application.
Get-NAVAppInfo -ServerInstance <<ServiceName>> -SymbolsOnly | % { Unpublish-NAVApp -ServerInstance BC140 -Name $_.Name -Version $_.Version }
5. Stop the server instance.
Stop-NAVServerInstance -ServerInstance <<ServiceName>>
** Replace <<ServiceName>> with Server Name.

Task 3: Upgrade the version 14 application database to the version 15 platform.
This Task runs a technical upgrade on the application database to convert it from the version 14 platform to the version 15 platform. This process updates the system tables of the database to the new schema and provides the latest platform.
You can run these commands either via Administration Shell or Powershell. I will use Powershell.
Import Business Central 15 Powershell Module and then Run Invoke NAVApplicationDatabaseConversion cmdlet.
Invoke-NAVApplicationDatabaseConversion -DatabaseServer <<ServerName>> DatabaseName <<DatabaseName>>

Task 4: Connect and configure the version 15 server instance to the application
In this task, you change server configuration settings that are required to complete the upgrade.
Set the server instance to connect to the application database.
Set-NAVServerConfiguration -ServerInstance <<ServiceName>> -KeyName DatabaseName -KeyValue <<Database Name>>
Disable task scheduler on the server instance for purposes of an upgrade.
Set-NavServerConfiguration -ServerInstance <<ServiceName>> -KeyName "EnableTaskScheduler" -KeyValue false
Restart the server instance.
Restart-NAVServerInstance -ServerInstance <<ServiceName>>
** Replace <<ServiceName>> with Service Name.
** Replace <<DatabaseName>> with Database Name.

Task 5: Publish the platform symbols, system application, and base application extensions.
In this task, you will publish extensions to the version 15 server instance. Publishing an extension adds the extension to the application database that is mounted on the server instance, making it available for installing on tenants.
1. Publish version 15 system symbols extension.
The symbols extension contains the required platform symbols that the base application depends on. The symbols extension package is called System.app.You find it where the AL Development Environment is installed, which by default is C:\Program Files (x86)\Microsoft Dynamics 365 Business Central\150\AL Development Environment.
Publish-NAVApp -ServerInstance <<ServiceName>> -Path "C:\Program Files (x86)\Microsoft Dynamics 365 Business Central\150\AL Development Environment\System.app" -PackageType SymbolsOnly
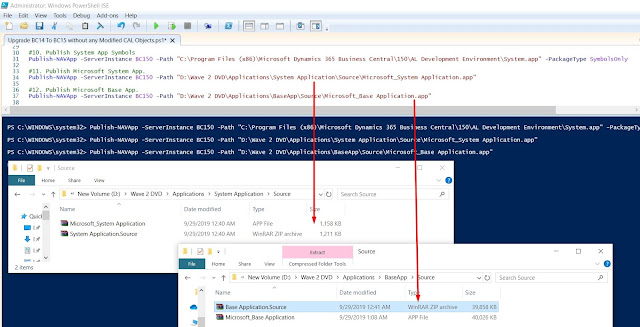
2. Publish the System Application extension (Microsoft_System Application.app).
You find the (Microsoft_System Application.app in the Applications\System Application\Source folder of installation media (DVD).
Publish-NAVApp -ServerInstance <<ServiceName>> -Path "D:\Wave 2 DVD\Applications\System Application\Source\Microsoft_System Application.app"
3. Publish the Business central Base Application Extension. (Microsoft_Base Application.app)
You find the (Microsoft_Base Application.app in the Applications\BaseApp\Source folder of installation media (DVD).
Publish-NAVApp -ServerInstance <<ServiceName>> -Path "D:\Wave 2 DVD\Applications\BaseApp\Source\Microsoft_Base Application.app"
** Replace <<ServiceName>> with Service Name.
** Replace Path to Actual Path of the file in Product DVD.
Task 6: Synchronize the tenant, system application, and base application extensions
In this task, you will synchronize the tenant's database schema with any schema changes in the application database and extensions.
1. Synchronize the tenant with the application database.
Sync-NAVTenant -ServerInstance <<ServiceName>> -Mode Sync

2. The next step is to get Version of Base and Application Extension which will be required to Sync Extensions.
Get-NAVAppInfo -ServerInstance <<ServiceName>>

Copy the Version of both Apps that will be used in the next commands.
3. Synchronize the tenant with the System Application extension.
Sync-NAVApp -ServerInstance <<ServiceName>> -Tenant default -Name "System Application" -Version <<extension version>>
4. Synchronize the tenant with the Business Central Base Application extension.
Sync-NAVApp -ServerInstance <<ServiceName>> -Tenant default -Name "Base Application" -Version <<extension version>>
** Replace <<ServiceName>> with Service Name.
** Replace <<extension version>> with Extension Version for base and System App.

Task 7: Install system application and base application extensions.
1. Install the system application extension on the tenant.
Install-NAVApp -ServerInstance <<ServiceName>> -Name "System Application" -Version <<extension version>>
2. Install the base application extension on the tenant.
Install-NAVApp -ServerInstance <<ServiceName>> -Name "Base Application" -Version <<extension version>>
** Replace <<ServiceName>> with Service Name.
** Replace <<extension version>> with Extension Version for base and System App.
At this point, the base application is upgraded to the version 15 platform and is operational. You should be able to open the application in the client.

Task 8: Upgrade the tenant data.
Upgrading data updates the data that is stored in the tables of the tenant database to the schema changes that have been made to tables in the application database and extensions.
1. To run the data upgrade, use the Start-NavDataUpgrade cmdlet:
Start-NAVDataUpgrade -ServerInstance <<ServiceName>> -FunctionExecutionMode Serial -SkipAppVersionCheck -Force

2. To view the progress of the data upgrade, you can run Get-NavDataUpgrade cmdlet with the –Progress switch.
Get-NAVDataUpgrade -ServerInstance <<ServiceName>> -Detailed Out-GridView
** Replace <<ServiceName>> with Service Name.

Task 9: Upgrade to the new versions of Microsoft extensions.
Complete this task to upgrade any Microsoft extensions that were used in your deployment to new versions that are available on the installation media (DVD).

There is a folder for each extension, and the extension package (.app file) is in the Source folder.
This Step is of three parts - Publish, Synchronize & Upgrade each extension.
1. Identify Installed Microsoft Extension
Get-NAVAppInfo -ServerInstance <<ServiceName>> | format-table Name,version

There are three types of Extension that we see on this list.
a. Microsoft Base and System Application (Business Central 15).
b. Microsoft Extensions (Business Central 14) &
c. Third-Party Extensions.

2. Publish, Sync and Upgrade App from Product DVD. (Only those listed above)
Publish-NAVApp -ServerInstance <<ServiceName>> -Path <path to extension package file> -SkipVerification
Sync-NAVApp -ServerInstance <<ServiceName>> -Name "<<extension name>>" -Version <<extension version>>
Start-NAVAppDataUpgrade -ServerInstance <<ServiceName>> -Name "<<extension name>>" -Version <<extension version>>
** Repeat above set of commands for all Microsoft Base Extension as shown below.

3. Now we need to un-publish old Extensions which are from the Business Central 14 version and are already upgraded.
Unpublish-NAVApp -ServerInstance <<ServiceName>> -Name "<<extension name>>" -Version <<extension version>>

Task 10: Publish, Sync & Install New Microsoft Extension available in Product DVD. (As of today - 11/11/2019)
- AMC Banking 365 Fundamentals.
- Test Framework.
Publish-NAVApp -ServerInstance <<ServiceName>> -Path <path to extension package file> -SkipVerification
Sync-NAVApp -ServerInstance <<ServiceName>> -Name "<<extension name>>"
Install-NAVApp -ServerInstance <<ServiceName>> -Name "<<extension name>>"

** Task 11 and 12 are only required if you have any 3rd party extensions that were installed in the version 14 deployment so that they can be published and installed on tenants.
Task 11: Configure the version 15 server instance for migrating 3rd party extensions.
In Business Central 15, all Apps should be depending on Base Microsoft App which was not required until Business Central 14 for Apps/Extensions.
1. Get the appId, name, and publisher of the base application.
Get-NAVAppInfo -ServerInstance <<ServiceName>> | format-table appId,Name,publisher

2. Set the DestinationAppsForMigration parameter for the server instance configuration to include the information about the base application.
Set-NAVServerConfiguration -ServerInstance <<ServiceName>> -KeyName "DestinationAppsForMigration" -KeyValue '[{"appId":<<id>>, "name":"Base Application", "publisher": "Microsoft"}]'
3. Restart Service Tier.
Restart-NAVServerInstance -ServerInstance <<ServiceName>>

Task 12: Synchronize and install 3rd party extensions.
As we discussed at the beginning of the article we have 04 custom extensions/apps in Business Central 14 before we start to upgrade.
All those 04 are still not installed as shown below.

1. Synchronize the tenant with the extension.
Sync-NAVApp -ServerInstance <<ServiceName>> -Name <<extension name>> -Version <extension version>
2. Install the extension.
Install-NAVApp -ServerInstance <<ServiceName>> -Name <<extension name>> -Version <extension version>

OR Install Extension from Extension Management Page.

At this point, the upgrade is complete, and you should be able to open the client.
Task 13. Post-upgrade tasks.
Enable task scheduler on the server instance.
Set-NavServerConfiguration -ServerInstance <<ServiceName>> -KeyName "EnableTaskScheduler" -KeyValue true
Restart the server instance.
Restart-NAVServerInstance -ServerInstance <<ServiceName>>
** Replace <<ServiceName>> with Service Name.

Hope you find it useful.
Let me know your views as a comment on this article.
MSDN Reference Article.
Download Powershell Cmdlet from GITHUB.
Regards,
Saurav Dhyani
www.sauravdhyani.com

In this article, we will discuss Upgrading a database to Business Central Wave 2 from Business Central Spring 2019 Release (14.x).
This all is for a Business Central Spring Database that does not include any C/AL Code Customization. The database can only include Third Party and Custom Extensions.
With this upgrade, we will replace the C/AL base application with a new Business Central 2019 release Wave 2 base application extension.
Prerequisite - Upgrade to Business Central Spring 2019 Cumulative Update 4 (version 14.5). If your current deployment is less than Cumulative Update 4 (14.x) then Upgrade to CU 04.
My Database (used for this article) has 4 Custom Extensions as shown below.

Task 1: Install Business Central version 15.
Before Installing Version 15, create desktop shortcuts to version 14.0 tools, such as Business central Server Administration tool, Administration Shell and Development Environment. After Installing Business Central 15 all these icons will be replaced with new version icons.
Then Install Business Central 15. Refer Here.
Task 2: Prepare the version 14 application and tenant databases for an upgrade.
1. Take a Full backup of the database.
2. Uninstall all extensions from the database either using PowerShell or Administration Shell.
Get-NAVAppInfo -ServerInstance <<ServiceName>> | % { Uninstall-NAVApp -ServerInstance BC140 -Name $_.Name -Version $_.Version}
** Replace <<ServiceName>> with Server Name.

3. Check Extension Management Page to Verify All Extensions are uninstalled.

4. Un-publish all systems, tests, and application symbols from the application.
Get-NAVAppInfo -ServerInstance <<ServiceName>> -SymbolsOnly | % { Unpublish-NAVApp -ServerInstance BC140 -Name $_.Name -Version $_.Version }
5. Stop the server instance.
Stop-NAVServerInstance -ServerInstance <<ServiceName>>
** Replace <<ServiceName>> with Server Name.

Task 3: Upgrade the version 14 application database to the version 15 platform.
This Task runs a technical upgrade on the application database to convert it from the version 14 platform to the version 15 platform. This process updates the system tables of the database to the new schema and provides the latest platform.
You can run these commands either via Administration Shell or Powershell. I will use Powershell.
Import Business Central 15 Powershell Module and then Run Invoke NAVApplicationDatabaseConversion cmdlet.
Invoke-NAVApplicationDatabaseConversion -DatabaseServer <<ServerName>> DatabaseName <<DatabaseName>>

Task 4: Connect and configure the version 15 server instance to the application
In this task, you change server configuration settings that are required to complete the upgrade.
Set the server instance to connect to the application database.
Set-NAVServerConfiguration -ServerInstance <<ServiceName>> -KeyName DatabaseName -KeyValue <<Database Name>>
Disable task scheduler on the server instance for purposes of an upgrade.
Set-NavServerConfiguration -ServerInstance <<ServiceName>> -KeyName "EnableTaskScheduler" -KeyValue false
Restart the server instance.
Restart-NAVServerInstance -ServerInstance <<ServiceName>>
** Replace <<ServiceName>> with Service Name.
** Replace <<DatabaseName>> with Database Name.

Task 5: Publish the platform symbols, system application, and base application extensions.
In this task, you will publish extensions to the version 15 server instance. Publishing an extension adds the extension to the application database that is mounted on the server instance, making it available for installing on tenants.
1. Publish version 15 system symbols extension.
The symbols extension contains the required platform symbols that the base application depends on. The symbols extension package is called System.app.You find it where the AL Development Environment is installed, which by default is C:\Program Files (x86)\Microsoft Dynamics 365 Business Central\150\AL Development Environment.
Publish-NAVApp -ServerInstance <<ServiceName>> -Path "C:\Program Files (x86)\Microsoft Dynamics 365 Business Central\150\AL Development Environment\System.app" -PackageType SymbolsOnly
2. Publish the System Application extension (Microsoft_System Application.app).
You find the (Microsoft_System Application.app in the Applications\System Application\Source folder of installation media (DVD).
Publish-NAVApp -ServerInstance <<ServiceName>> -Path "D:\Wave 2 DVD\Applications\System Application\Source\Microsoft_System Application.app"
3. Publish the Business central Base Application Extension. (Microsoft_Base Application.app)
You find the (Microsoft_Base Application.app in the Applications\BaseApp\Source folder of installation media (DVD).
Publish-NAVApp -ServerInstance <<ServiceName>> -Path "D:\Wave 2 DVD\Applications\BaseApp\Source\Microsoft_Base Application.app"
** Replace <<ServiceName>> with Service Name.
** Replace Path to Actual Path of the file in Product DVD.

Task 6: Synchronize the tenant, system application, and base application extensions
In this task, you will synchronize the tenant's database schema with any schema changes in the application database and extensions.
1. Synchronize the tenant with the application database.
Sync-NAVTenant -ServerInstance <<ServiceName>> -Mode Sync

2. The next step is to get Version of Base and Application Extension which will be required to Sync Extensions.
Get-NAVAppInfo -ServerInstance <<ServiceName>>

Copy the Version of both Apps that will be used in the next commands.
3. Synchronize the tenant with the System Application extension.
Sync-NAVApp -ServerInstance <<ServiceName>> -Tenant default -Name "System Application" -Version <<extension version>>
4. Synchronize the tenant with the Business Central Base Application extension.
Sync-NAVApp -ServerInstance <<ServiceName>> -Tenant default -Name "Base Application" -Version <<extension version>>
** Replace <<ServiceName>> with Service Name.
** Replace <<extension version>> with Extension Version for base and System App.

Task 7: Install system application and base application extensions.
1. Install the system application extension on the tenant.
Install-NAVApp -ServerInstance <<ServiceName>> -Name "System Application" -Version <<extension version>>
2. Install the base application extension on the tenant.
Install-NAVApp -ServerInstance <<ServiceName>> -Name "Base Application" -Version <<extension version>>
** Replace <<ServiceName>> with Service Name.
** Replace <<extension version>> with Extension Version for base and System App.
At this point, the base application is upgraded to the version 15 platform and is operational. You should be able to open the application in the client.

Task 8: Upgrade the tenant data.
Upgrading data updates the data that is stored in the tables of the tenant database to the schema changes that have been made to tables in the application database and extensions.
1. To run the data upgrade, use the Start-NavDataUpgrade cmdlet:
Start-NAVDataUpgrade -ServerInstance <<ServiceName>> -FunctionExecutionMode Serial -SkipAppVersionCheck -Force

2. To view the progress of the data upgrade, you can run Get-NavDataUpgrade cmdlet with the –Progress switch.
Get-NAVDataUpgrade -ServerInstance <<ServiceName>> -Detailed Out-GridView
** Replace <<ServiceName>> with Service Name.

Task 9: Upgrade to the new versions of Microsoft extensions.
Complete this task to upgrade any Microsoft extensions that were used in your deployment to new versions that are available on the installation media (DVD).

There is a folder for each extension, and the extension package (.app file) is in the Source folder.
This Step is of three parts - Publish, Synchronize & Upgrade each extension.
1. Identify Installed Microsoft Extension
Get-NAVAppInfo -ServerInstance <<ServiceName>> | format-table Name,version

There are three types of Extension that we see on this list.
a. Microsoft Base and System Application (Business Central 15).
b. Microsoft Extensions (Business Central 14) &
c. Third-Party Extensions.

2. Publish, Sync and Upgrade App from Product DVD. (Only those listed above)
Publish-NAVApp -ServerInstance <<ServiceName>> -Path <path to extension package file> -SkipVerification
Sync-NAVApp -ServerInstance <<ServiceName>> -Name "<<extension name>>" -Version <<extension version>>
Start-NAVAppDataUpgrade -ServerInstance <<ServiceName>> -Name "<<extension name>>" -Version <<extension version>>
** Repeat above set of commands for all Microsoft Base Extension as shown below.

3. Now we need to un-publish old Extensions which are from the Business Central 14 version and are already upgraded.
Unpublish-NAVApp -ServerInstance <<ServiceName>> -Name "<<extension name>>" -Version <<extension version>>

Task 10: Publish, Sync & Install New Microsoft Extension available in Product DVD. (As of today - 11/11/2019)
- AMC Banking 365 Fundamentals.
- Test Framework.
Publish-NAVApp -ServerInstance <<ServiceName>> -Path <path to extension package file> -SkipVerification
Sync-NAVApp -ServerInstance <<ServiceName>> -Name "<<extension name>>"
Install-NAVApp -ServerInstance <<ServiceName>> -Name "<<extension name>>"

** Task 11 and 12 are only required if you have any 3rd party extensions that were installed in the version 14 deployment so that they can be published and installed on tenants.
Task 11: Configure the version 15 server instance for migrating 3rd party extensions.
In Business Central 15, all Apps should be depending on Base Microsoft App which was not required until Business Central 14 for Apps/Extensions.
1. Get the appId, name, and publisher of the base application.
Get-NAVAppInfo -ServerInstance <<ServiceName>> | format-table appId,Name,publisher

2. Set the DestinationAppsForMigration parameter for the server instance configuration to include the information about the base application.
Set-NAVServerConfiguration -ServerInstance <<ServiceName>> -KeyName "DestinationAppsForMigration" -KeyValue '[{"appId":<<id>>, "name":"Base Application", "publisher": "Microsoft"}]'
3. Restart Service Tier.
Restart-NAVServerInstance -ServerInstance <<ServiceName>>

Task 12: Synchronize and install 3rd party extensions.
As we discussed at the beginning of the article we have 04 custom extensions/apps in Business Central 14 before we start to upgrade.
All those 04 are still not installed as shown below.

1. Synchronize the tenant with the extension.
Sync-NAVApp -ServerInstance <<ServiceName>> -Name <<extension name>> -Version <extension version>
2. Install the extension.
Install-NAVApp -ServerInstance <<ServiceName>> -Name <<extension name>> -Version <extension version>

OR Install Extension from Extension Management Page.

At this point, the upgrade is complete, and you should be able to open the client.
Task 13. Post-upgrade tasks.
Enable task scheduler on the server instance.
Set-NavServerConfiguration -ServerInstance <<ServiceName>> -KeyName "EnableTaskScheduler" -KeyValue true
Restart the server instance.
Restart-NAVServerInstance -ServerInstance <<ServiceName>>
** Replace <<ServiceName>> with Service Name.

Hope you find it useful.
Let me know your views as a comment on this article.
MSDN Reference Article.
Download Powershell Cmdlet from GITHUB.
Regards,
Saurav Dhyani
www.sauravdhyani.com
Great and usefull
ReplyDeleteGreat to hear that you like article.
DeleteHi, what about the customized solution? any ideas?
ReplyDeleteHi Grizzly,
DeleteI will surely write about it during this week. It a different process.
Stay tuned.
Hi,
ReplyDeleteI have created one app in one version. and later we created another new version app with same changes as created earlier and i want update new version changes to existing version without disturbing data in app, how to do that please tell me if any idea on that.
Hi,
DeleteWith your new version of App make sure you have upgrade codeunit and if any data changes you should handle them via upgrade codeunit.
Hi,
ReplyDeleteI doing an upgrade from BC 14 CU04 to BC 15 CU 02. Thanks to your article i know that i can't upgrade directly to BC 15 CU 02 from BC 14 CU 04 i should upgrade first to BC 14 CU 07.
My database contains LS objects in BC 14 CU 04 when i upgraded to CU 07 i didn't install the LS object for the corresponding CU 07 version. I directly went to upgrade from BC 14 CU 07 to BC 15 CU 02 but whenever I do "Sync-NAVApp -ServerInstance BC150 -Name "Base Application" -Version 15.2.39040.0"
I'm getting the following error
"Sync-NAVApp : The following SQL error was unexpected:
No item by the name of '"dbo"."TEST$Payment Terms$0"' could be found in the current database 'BC150', given that @itemtype was input as '(null)'.
Caution: Changing any part of an object name could break scripts and stored procedures.
At line:2 char:1
+ Sync-NAVApp -ServerInstance BC150 -Name "Base Application" -Version 1 ...
+ ~~~~~~~~~~~~~~~~~~~~~~~~~~~~~~~~~~~~~~~~~~~~~~~~~~~~~~~~~~~~~~~~~~~~~
+ CategoryInfo : InvalidOperation: (:) [Sync-NAVApp], InvalidOperationException
+ FullyQualifiedErrorId : MicrosoftDynamicsNavServer$BC150/default,Microsoft.Dynamics.Nav.Apps.Management.Cmdlets.SyncNavApp"
, how to do that please tell me if any idea on that.
Hi Robert,
ReplyDeleteLets take a step back and help me understanding how you upgraded from BC14CU04 to BC14CU07.
1. You have LS as C/AL Addon (with Objects) in CU04. Is that correct?
2. During your Upgrade from BC14CU04 to BC14CU07 did you only did a exe conversion or also merged code?
With Modified Based Objects (LS Fields & tables) You cannot directly upgrade to BC15 (as this article is for a database with no Customs in it). An Addon will also be considered as an Custom. So first you need to switch LS from custom CAL to Extension and then proceed.
Otherwise i will be huge task to merge LS in BC15 and then upgrade which i will not recommend?
I can see LS Retail have an Extension in AppSource and i assume that they will support you with Extension on-prem. First Switch from Modified CAL TO Extension in BC14 and then plan to Upgrade to BC 15.
If you have other customs / addons then those also need to be changed to Extension.
hi Saurav,
DeleteThanks for your reply.
I currently have a BC14 CU04 with LS objects as C/AL, and I've got multiple AL extensions installed in it and there's no customer modification in the C/AL objects and note that I don't need the LS data from the tables.
I followed these steps to upgrade from CU04 to CU07:
1. I've uninstalled all the AL extensions from the database.
2. Deleted all objects beside the tables.
3. Installed the CU07 version and Ran the Finsql.exe from CMD using generatesymbolreference.
4. Imported the CU07 original objects from the Cronos database into my client Database and filtered on the version name {@*LS*} to delete the LS objects from it because in BC15 the LS objects are converted into AL extension.
5. Changed the application version to the CU07 version.
6. Ran NavDataUpgrade.
7. Published the System.app and Test.app and then I used [finsql.exe Command=generatesymbolreference, Database="ClientBC15", ServerName=MSSQLSERVER13].
Then I should be having a BC14 CU07 database with no LS in it just the AL extensions in the database As follow [dbo.CompanyName$G_L Entry$12ddeb-ea4f-47ee-b512] but not published.
And I just followed the steps above to upgrade it from BC14 CU07 to BC15 CU02 everything was going fine until using the Sync-NAVApp "Base Application" and got the above provided error.
Hi Robert,
DeleteAFAIK LS Retail will have two types of changes in C/AL.
1. Base Object Modified (Table Field is what impact during upgrade).
2. LS Specific New Objects. (New LS Tables).
If you dont want to use LS Retail going forward here is approach that i will take before starting any step.
1. Uninstall all Extensions.
2. Delete New LS Objects using @LS* with Sync Schema Force.
** This will remove all LS table data from database.
3. Replace all objects with BC CU04 Microsoft Object with Sync Schema Force.
** This will remove all customs from database.
4. Now C/AL Database is with no customs.Once Done Generate Symbols.
5. Repair and Reinstall all Custom Extensions.
6. Take a backup.
7. Uninstall all Extensions.
8. Delete all objects other than tables and system codeunits.
9. Open Database with BC14 CU07 and do technical conversion.
10. Sync Schema.
11. Import Base Microsoft Objects from CU07 Objects.
12. Sync Schema.
13. Once Done Generate Symbols.
14. Change Application version.
15. Repair and Reinstall all Custom Extensions.
16. Then you can follow steps as listed in this article.
This comment has been removed by the author.
DeleteHi Saurav,
ReplyDeleteThank you very much and your upgrade article are very clear and really helpful :)
I love it.
Thanks for the comment.
DeleteIts always great to hear back.
Am at task 13 and installing custom extension getting error - object of type Table with ID 14 could not be found.
ReplyDeleteHowever at syncing it was showing warning-WARNING: Cannot synchronize the extension PARCESA because it is already synchronized. where "PARCESA" is my custom extension
Hi,
Deletewas that extension was part of the database before upgrade?
If yes then you should be running upgrade of that App instead of Install.
As usual, a fantastic accounting of the upgrade process. I followed this document to the letter and it worked like a charm. Thanks, Saurav. You are an invaluable member of the NAV/BC community. Your efforts have made my life MUCH easier and are greatly appreciated!
ReplyDeleteThank you @Justin.
DeleteI try to contribute as much as I can and it feels great to hear that these articles are helping people in community.
Thank you for your comment and keep suggesting new articles that I can write and also feedback on existing articles.