Hi Readers,
I am optimistic that everyone was able to follow what we discussed till now. If you haven't read the earlier article, then
Refer to the Table of Content.
So in this article, we will add fields added in tables in the pages so that user can access those fields.
The customer Requires new fields added in few standard pages.
In this article, we will learn a new object type in Business Central i.e Page Extension.
Page Extension is a new object type using which we can add fields, actions, and functions in the base pages without modifying Microsoft Base Objects.
Currently, let's add a new field in pages -
Add a New file on the Left-hand Panel - Right click and select New File as shown below.
As per our standard Page Extension file Name is - SDH_PageExt_50000_SalesOrderExt.al

Snippet for adding a new page extension, use snippet tpageext as shown below.

Next step is to set the following properties (as shown below) -
ID - Object ID.
MyExtension - Extended Page Name.
MyTargetPage - Extending Base Page Name.

Let's understand why and what we set.
ID - Object ID for the new object created.
MyExtension - Unique Page Extension Object Name.
MyTargetPage - Name of the Microsoft base page name which we are extending or customizing.
By Default Page Extension Provide three sections -

But You can also add additional sections (if required) like -
- Triggers.
- Function.
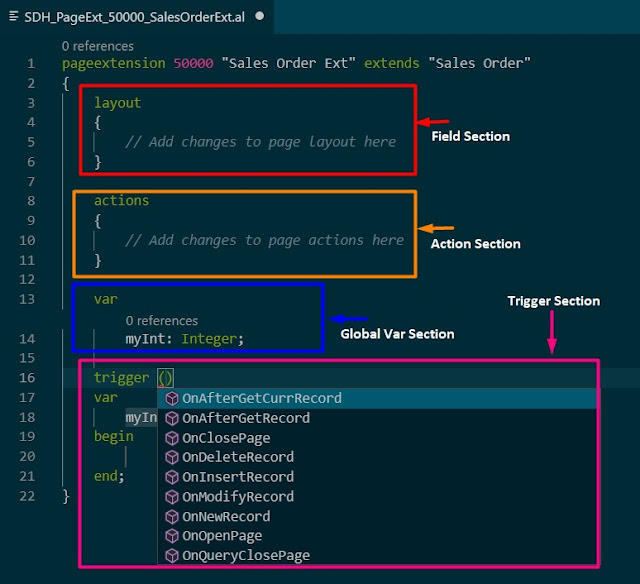
Triggers for are the page is below -
So after all these let's add the field that we want to add in this Sales Order Page using Page Extension.
Remember -
1. All Fields in the page are added in Layout Area.
2. Adding a field in Page using Page Extension will be a bit different than adding a field in a table using table Extension.
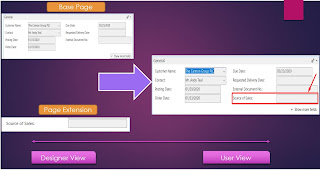
As we want to add a field in Page (Sales order page), we need to tell the system where we want to add the field. There are 04 options that we can choose from while adding a field in the page. Let's understand why and what are those options.

Above is a screenshot of the Sales order Page. Now while adding a field in this page, we need to specify under which section and at what position we want to add the field.
AL Provide us 04 options to specify the position of a new field that we are adding and those options are -

What is Anchor? - The name of the control serving as an anchor for placing the new control.
Let's assume I want to add my field after External Document No. then -

With this, the Page Extension is ready for Sales Order. In the same way, you can complete all other page extensions as shown below.
Sales Order Extension - SDH_PageExt_50000_SalesOrderExt.al

Posted Sales Invoice Extension - SDH_PageExt_50001_PostedSalesInvoiceExt.al

Posted Sales Shipment Extension - SDH_PageExt_50002_PostedSalesShipmentExt.al

Stay Tuned for more. I hope you learned something today.
We will discuss more in the next article. Please provide feedback as comments to the article.
To share the knowledge share the article on social media.
Regards,
Saurav Dhyani

I am optimistic that everyone was able to follow what we discussed till now. If you haven't read the earlier article, then
Refer to the Table of Content.
So in this article, we will add fields added in tables in the pages so that user can access those fields.
The customer Requires new fields added in few standard pages.
In this article, we will learn a new object type in Business Central i.e Page Extension.
Page Extension is a new object type using which we can add fields, actions, and functions in the base pages without modifying Microsoft Base Objects.
Currently, let's add a new field in pages -
- Sales Order.
- Posted Sales Shipment.
- Posted Sales Invoice.
Add a New file on the Left-hand Panel - Right click and select New File as shown below.
As per our standard Page Extension file Name is - SDH_PageExt_50000_SalesOrderExt.al

Snippet for adding a new page extension, use snippet tpageext as shown below.

Next step is to set the following properties (as shown below) -
ID - Object ID.
MyExtension - Extended Page Name.
MyTargetPage - Extending Base Page Name.

Let's understand why and what we set.
ID - Object ID for the new object created.
MyExtension - Unique Page Extension Object Name.
MyTargetPage - Name of the Microsoft base page name which we are extending or customizing.
By Default Page Extension Provide three sections -
- Layout - To Add New Fields in the page.
- Action - To Add New actions on the page.
- Global Variables.

But You can also add additional sections (if required) like -
- Triggers.
- Function.

Triggers for are the page is below -
- OnAfterGetCurrRecord.
- OnAfterGetRecord.
- OnClosePage.
- OnDeleteRecord.
- OnInsertRecord.
- OnModifyRecord.
- OnNewRecord.
- OnOpenPage.
- OnQueryClosePage.
So after all these let's add the field that we want to add in this Sales Order Page using Page Extension.
Remember -
1. All Fields in the page are added in Layout Area.
2. Adding a field in Page using Page Extension will be a bit different than adding a field in a table using table Extension.
As we want to add a field in Page (Sales order page), we need to tell the system where we want to add the field. There are 04 options that we can choose from while adding a field in the page. Let's understand why and what are those options.

Above is a screenshot of the Sales order Page. Now while adding a field in this page, we need to specify under which section and at what position we want to add the field.
AL Provide us 04 options to specify the position of a new field that we are adding and those options are -
- AddFirst - Add as first control in a tab.
- AddLast - Add as last control in a tab.
- AddBefore - Add field before a standard field in the page.
- AddAfter - Add field after a standard field in the page.

What is Anchor? - The name of the control serving as an anchor for placing the new control.
Let's assume I want to add my field after External Document No. then -
- We can use Addafter with an anchor External Document No.
- For adding a field in the page you can use tpagefield snippet.
- Specify the Field Name and Source Expression in the field.
- For the Field, we can also add properties. As we discussed earlier there is a mandatory property for user-visible items like fields i.e ApplicationArea.
- If you want to have to see the field in every case then you remember NAV Page Field Property Importance.

With this, the Page Extension is ready for Sales Order. In the same way, you can complete all other page extensions as shown below.
Sales Order Extension - SDH_PageExt_50000_SalesOrderExt.al


Posted Sales Shipment Extension - SDH_PageExt_50002_PostedSalesShipmentExt.al

Stay Tuned for more. I hope you learned something today.
We will discuss more in the next article. Please provide feedback as comments to the article.
To share the knowledge share the article on social media.
Regards,
Saurav Dhyani
Detailed explanation is required for Importance property, then it is more understandable.
ReplyDeleteHope this helps.
Deletehttps://docs.microsoft.com/en-us/dynamics365/business-central/dev-itpro/developer/properties/devenv-importance-property
This is interesting. I am impressed.
ReplyDeleteGreat to hear that.
DeleteExcellent article. Very useful and very informative. Great Job Saurav. Thanks Spriya.
ReplyDeleteThanks @Spriya.
Delete