 Hi Readers,
I am sure everyone was able to develop a table and page in AL based on Last articles in this series. If you haven't read the earlier article, then refer to the table of content.
As promised in this article we will customize base tables as per customer requirements.
The Customer requires new field added in below-listed base tables and set table relation to the new table created earlier.
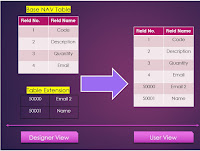
Let's try to introduce new Object Type in Business Central i.e. Table Extension.
Table Extension is a new object using which we can add fields and functions in the base table without modifying Microsoft base objects.
Currently, let's add a new field in tables -
- Sales Header.
- Sales Invoice Header.
- Sales Shipment Header.
Add a new file on the Left-hand Panel - right click and select New File as shown below.
As per our standard Table Extension file name is - SDH_TableExt_50000_SalesHeaderExt.al
Snippet for adding a new table extension, use snippet ttableext as shown below.
Next step to set (as shown below) -
- ID - Object ID.
- MyExtension - Extended Object Name.
- MyTargetTable - Extending Base Object Name.
Let's understand why and what we set.
ID - Object ID for the new object created.
Table Extension Object Name - Uniquely name of the new object created.
Base Object Name - Name of the Microsoft base object which we are extending or customizing.
By Default Table Extension snippet provides two sections which are -
- Field Addition.
- Global Variables.
But you can also add new sections (if required) like -
- Keys.
- Triggers.
- Functions.
As you see above there are more trigger options in Table Extension than Table. Let's try to understand them.
Standard Triggers which everyone understands -
- OnInsert.
- OnModify.
- OnDelete.
- OnRename.
** All these triggers operates like normal table triggers but only for fields in the table extension.
Other 8 pairs (OnBefore & OnAfter) Executes on actual table i.e -
- OnBeforeInsert
- OnAfterInsert
- OnBeforeModify
- OnAfterModify
- OnBeforeDelete
- OnAfterDelete
- OnBeforeRename
- OnAfterRename
We will discuss about these in future articles.
Now, let's add a new field that we want in sales header table using table extension using snippet tfield. As we need to set table relation to the new table created we will use to set the property for the field as shown below.
With table extension for sales header is ready. Follow the same steps for Sales Invoice Header and Sales Shipment Header Table Extensions.
As per our standard Table Extension file name are -
- Sales Invoice Header Extension - SDH_TableExt_50001_SalesInvoiceHeaderExt.al
- Sales Shipment Header Extension - SDH_TableExt_50002_SalesShipmentHeaderExt.al
Stay Tuned for more. I hope you learned something today.
We will discuss the page extension object in the next article. Please provide your feedback as comments to the article.
To share the knowledge share the article on social media.
Regards,
Saurav Dhyani


More detailed explanation required for table relation. If possible add more about this here.
ReplyDeleteThanks.
Its same as of C/Side. Do you want to know anything specific.
DeleteI would appreciate a more explanation of the table relation.
ReplyDeleteIts same as of C/Side. Do you want to know anything specific.
Delete