 Hi Readers,
I am sure you have completed all Prerequisites, as listed in Customer Requirements article (first article in this series).
Please Refer Table of Index for AL Dev.
As promised in this article we will build the new table as per customer required.
The customer requires a new table to set up master for Source of Sales. Below is the field list that we plan to have it on the table.
Let's try to add this table to our extension.
Add a New file on Left-hand Panel - right click & select New File as shown below.
** Plan a file naming standard for your company or you as an individual developer. I am using a combination of -
- Developer Initials / Company Initials
- ObjectType
- ObjectID
- ObjectName
So my table file name is - SDH_Table_50000_Sourceofsales.al

AL provides a list of the snippets to make it easy for developers to add objects in extension. Snippet for getting a table layout use snippet ttable as shown below.

Assign ID and provide a name to the table that you are adding, as shown below.

Click tab after ttable and it will generate a basic table design layout as shown below.
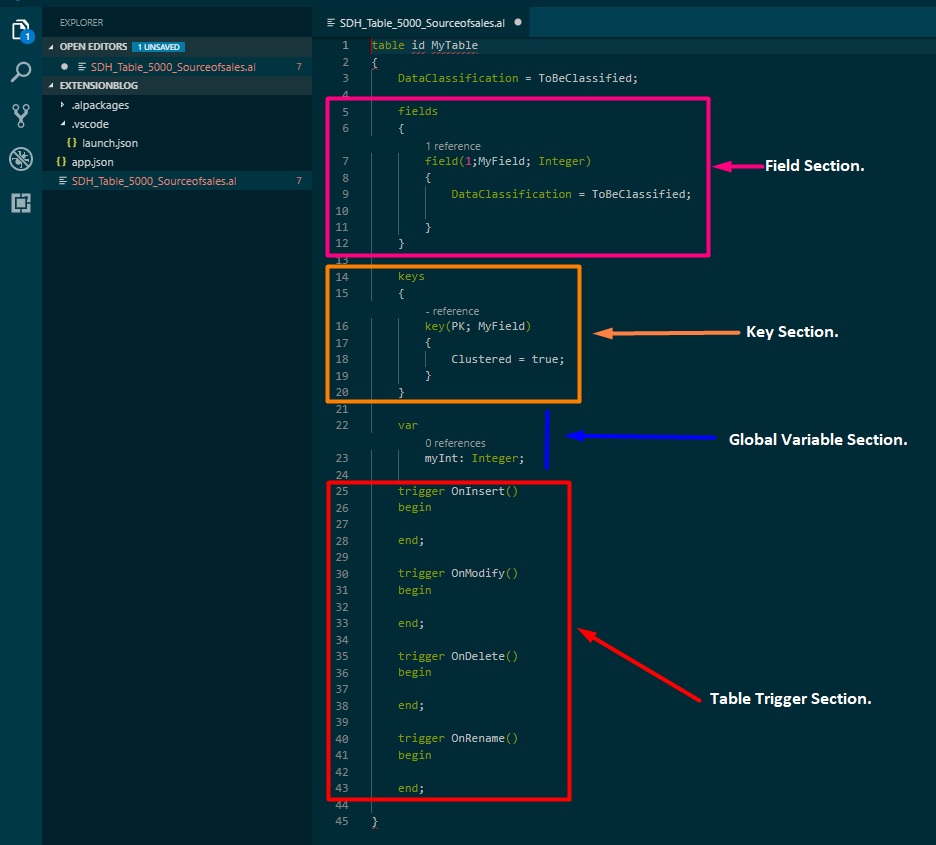
You can segregate the whole table into 4 Sections -
- Field Section - This section contains all the fields that you want to add to the table.
- Key Section - All Primary and Secondary key can be added to the following areas.
- Global Variable Section - All global variables are added in this section.
- Table Trigger Section - All base table triggers are available in the areas. If required you can add code in this section.
Plus, If you don't need any of these sections you can delete that section (which you cannot do in NAV / CAL).
Let's add fields in the table as discussed above and see how easy it. For adding a new field you can also use snipped tfield as shown below.

The area between {} inside a field, where you can add field properties. But in NAV you can see using Shift+F4, but in AL you can use Ctrl + Spacebar, to see all field list, as shown below.

To Showcase functions usages, we will add an additional field - "Last Modified Date Time", which get set whenever the record is added or modified. Below are the fields and code added in the table.

We will require to have a local function (procedure), to update "Last Modified Date Time" and then calling that function from OnInsert, OnModify, and OnRename as shown below.

As our table design is completed, you will see an error message about the object number in the Problem area below. There is an object range for each extension that you can define. Update your number series in the app.json as shown below.

Stay tuned, we will discuss about pages in this series next article. Let me know your views on how easy/difficult it is.
Regards,
Saurav Dhyani
www.sauravdhyani.com
Usefull Saurav. Keep up the Good Job!
ReplyDeleteGreat to hear that you find the information useful.
Deletehi saurav
ReplyDeletei am doing the same thing but getting below error while publishing.
The request for path /BC130/dev/apps?SchemaUpdateMode=synchronize failed with code 422. Reason: Your program license does not allow you to publish 'Source of sales'.
@Sanjeet,
DeleteYou need to have partner licensce saved in database or uploaded on server.
After uploading licensce please restart service tier.
Hi Saurav -
ReplyDeleteThank you for such a wonderful article. Thanks for sharing your wealth of knowledge about Wave 2.
Welcome @Spriya.
DeleteHi Saurav,
ReplyDeleteIf I use Object Series from 50100 to .. then it is fine.
If i want to use series from 50000, how to upload license?
Hi Nitin,
DeleteIf you are using BC 13/14 then you can use development environment.
For Business Central 15 or higher you can do that as discussed in article -
https://saurav-nav.blogspot.com/2019/10/msdyn35bc-2019-wave-2-how-do-i-check.html
Its really useful for beginners like me. A big thanks for such series. Pl. publish more series like this.
ReplyDeleteGreat to hear that you find the information useful.
Delete