Hi Readers,
We have already talked about the number of steps for upgrading to Business Central on Premises from different NAV versions.

After that article, I received multiple requests for an article which list down steps for Data Migration. In this article, we will discuss steps of data migration to MSDYN365BC (on-Prem) from NAV 2017.
For this article, I am considering a Cronus Demo Database without any customization. For an actual upgrade project, we will have to complete object merge using compare and Merge process.
After the Merge Process, the next step is data migration. Let's discuss those steps.
Direct Upgrade to Microsoft Dynamics 365 Business Central (on-Prem) is from following versions -
1. NAV 2015.
2. NAV 2016.
3. NAV 2017.
4. NAV 2018.
Step 1 - Full SQL Database backup of Old Database.
Create a full backup of the old database in the SQL Server. Alternatively, you can make a copy of the old database and perform the upgrade tasks on the copy.
Step 2 - Uninstall all extensions in the old database. (Applies for NAV 2016 or Higher)
To get a list of the extensions that are installed, run this command:
Get-NAVAppInfo -ServerInstance <ServerInstanceName> -Tenant default

For each extension, run this command to uninstall it:
Uninstall-NAVApp -ServerInstance <ServerInstanceName> -Name <Name> -Version <N.N.N.N>
OR
Remove them all at once, you can run this command:
Get-NAVAppInfo -ServerInstance <ServerInstanceName> -Tenant default | % { Uninstall-NAVApp -ServerInstance <ServerInstanceName> -Name $_.Name -Version $_.Version }
Replace <ServerInstanceName> with the name of the Dynamics NAV Server instance that the database connects to.

Step 3 - Upload the Business Central partner license to the old database
Step 4 - Delete all objects except tables from the old database.
In the development environment version that matches the database, open the old database, open Object Designer, select all objects except tables, and then choose Delete.

Step 5 - Clear server instance and debugger breakpoint records from the old database.
DELETE FROM [<My NAV Database Name>].[dbo].[Server Instance]
DELETE from [<My NAV Database Name>].[dbo].[Debugger Breakpoint]

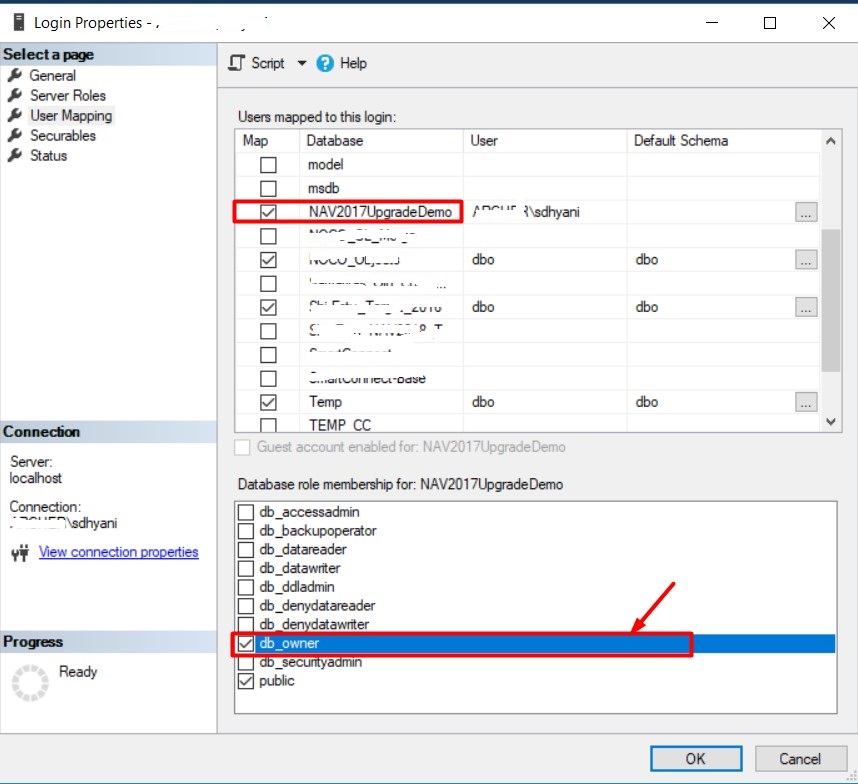
Step 6 - Convert the old database to the Business Central format.
Setup user permission as db_owner in SQL Server as shown below.

Run Business central development Environment (#MSDYN365BC) as administrator. Open Database with Business Central Executable. Do not run schema synchronization at this time. Choose to run it later.

Step 7 - Import the upgraded application objects.
Using Dynamics NAV Development Environment for Business Central, import the application objects that you want in the database. (Result of Object Merge).
Select Ok to open the import worksheet.
Select Replace All.
Select Schema Synchronization to Later.

Using Dynamics NAV Development Environment for Business Central, import appropriate Upgrade Codeunit. (From Product DVD)
Select Ok to open the import worksheet.
Select Replace All.
Select Schema Synchronization to Later.

Step 8 - Connect a Business Central Server instance to the converted database.
Map to a NAV Service Tier or use Set-NAVServerConfiguration cmdlet in the Business Central Administration Shell to connect a Business Central Server instance to the converted database.
The service account that is used by the Business Central Server instance must be a member of the db_owner role in the Business Central database on SQL Server or Azure SQL Database.
When upgrading a large database, you should increase the SQL Command Timeout setting for the Business Central Server instance, to avoid timeouts during schema synchronization. The default setting is 30 minutes.


We have already talked about the number of steps for upgrading to Business Central on Premises from different NAV versions.

After that article, I received multiple requests for an article which list down steps for Data Migration. In this article, we will discuss steps of data migration to MSDYN365BC (on-Prem) from NAV 2017.
For this article, I am considering a Cronus Demo Database without any customization. For an actual upgrade project, we will have to complete object merge using compare and Merge process.
After the Merge Process, the next step is data migration. Let's discuss those steps.
Direct Upgrade to Microsoft Dynamics 365 Business Central (on-Prem) is from following versions -
1. NAV 2015.
2. NAV 2016.
3. NAV 2017.
4. NAV 2018.
Step 1 - Full SQL Database backup of Old Database.
Create a full backup of the old database in the SQL Server. Alternatively, you can make a copy of the old database and perform the upgrade tasks on the copy.
Step 2 - Uninstall all extensions in the old database. (Applies for NAV 2016 or Higher)
To get a list of the extensions that are installed, run this command:
Get-NAVAppInfo -ServerInstance <ServerInstanceName> -Tenant default

For each extension, run this command to uninstall it:
Uninstall-NAVApp -ServerInstance <ServerInstanceName> -Name <Name> -Version <N.N.N.N>
OR
Remove them all at once, you can run this command:
Get-NAVAppInfo -ServerInstance <ServerInstanceName> -Tenant default | % { Uninstall-NAVApp -ServerInstance <ServerInstanceName> -Name $_.Name -Version $_.Version }
Replace <ServerInstanceName> with the name of the Dynamics NAV Server instance that the database connects to.

Step 3 - Upload the Business Central partner license to the old database
Step 4 - Delete all objects except tables from the old database.
In the development environment version that matches the database, open the old database, open Object Designer, select all objects except tables, and then choose Delete.
- Select All from object designer and mark all. (Edit - Toggle Mark).
- Select Tables from Object designer and remove mark (Edit - Toggle Mark).
- Select All and Marked only. (View - Marked only).

Step 5 - Clear server instance and debugger breakpoint records from the old database.
DELETE FROM [<My NAV Database Name>].[dbo].[Server Instance]
DELETE from [<My NAV Database Name>].[dbo].[Debugger Breakpoint]

Step 6 - Convert the old database to the Business Central format.
Setup user permission as db_owner in SQL Server as shown below.
Run Business central development Environment (#MSDYN365BC) as administrator. Open Database with Business Central Executable. Do not run schema synchronization at this time. Choose to run it later.

Step 7 - Import the upgraded application objects.
Using Dynamics NAV Development Environment for Business Central, import the application objects that you want in the database. (Result of Object Merge).
Select Ok to open the import worksheet.
Select Replace All.
Select Schema Synchronization to Later.

Using Dynamics NAV Development Environment for Business Central, import appropriate Upgrade Codeunit. (From Product DVD)
Select Ok to open the import worksheet.
Select Replace All.
Select Schema Synchronization to Later.

Step 8 - Connect a Business Central Server instance to the converted database.
Map to a NAV Service Tier or use Set-NAVServerConfiguration cmdlet in the Business Central Administration Shell to connect a Business Central Server instance to the converted database.
The service account that is used by the Business Central Server instance must be a member of the db_owner role in the Business Central database on SQL Server or Azure SQL Database.
When upgrading a large database, you should increase the SQL Command Timeout setting for the Business Central Server instance, to avoid timeouts during schema synchronization. The default setting is 30 minutes.

Step 9 - Compile all objects
Use the Dynamics NAV Development Environment or finsql.exe to compile all objects.
This includes the imported application objects, data tables, and system tables.
Choose to run schema synchronization later.

Step 10 - Delete Objects, no longer Required.
If you get errors on the following table objects, use the Object Designer to delete the objects because they are no longer used. (Applies for NAV 2015 & NAV 2016 Only)
Table Filter - 470|824|825|827|828|829|1510
When you delete a table object, in the Delete confirmation dialog box that appears, set the Synchronize Schema option to Force.
Step 11 - Increase the application version of the database (Applies if Upgrading from NAV 2018)
If you are upgrading from Microsoft Dynamics NAV 2018, you must increase the application version that is assigned to the database.
Use the Set-NAVApplication cmdlet of the Business Central Administration Shell to increase the application version number of the database from its current version.
To see the current version, use the following command:
Get-NAVApplication -ServerInstance <ServerInstanceName>
To change the version, use the following command:
Set-NAVApplication -ServerInstance <ServerInstanceName> -ApplicationVersion <N.N.N.N> -Force
For example, if the old version was 11.0.24279.0, then you could change the version to 13.0.24279.0.

Step 12 - Run the schema synchronization on the imported objects
Run - Sync-NAVTenant -ServerInstance <ServerInstanceName>

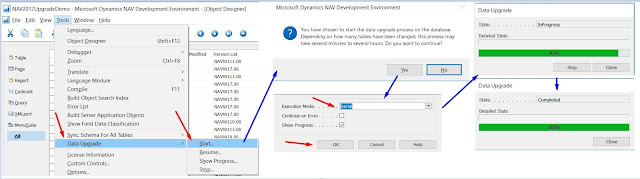
Step 13 - Run the data upgrade process
A data upgrade runs the upgrade toolkit objects, such as upgrade codeunits and upgrades tables, to migrate business data from the old table structure to the new table structure.
You can start the data upgrade from the Dynamics NAV Development Environment or Business Central Administration Shell.

Step 14 - Import upgraded permission sets and permissions
Import the permission sets and permissions XML files that you exported from the old database as follows:
1. Delete all permission sets in the database except the SUPER permission set.
2. In Object Designer, run page 9802 Permission Sets, and then delete the permission sets except for SUPER.
3. Run XMLport 9171 and XMLport 9172 to import the permission sets and permission XML files.
Step 15 - Configure pages and reports included in the MenuSuite to be searchable in the Web client.
The MenuSuite is no longer used to control whether a page or report can be found in the search feature of the Web client. This is now determined by specific properties on the page and report objects.
(I will publish a separate article for this step and how to process it).
Step 16 - Delete the upgrade objects
At this point, you have upgraded the database to Business Central. Now, you can delete the upgrade codeunits and upgrade table objects that you imported in task 9. This task is recommended but not required.
When you delete tables, on the Delete dialog box, set the Synchronize Schema option to Force.
Filter Objects with Version Tag - @*UPG*
Delete all objects in the filter with the Sync Schema Force.

With these steps, data migration is over. Next step is to install new extensions and Enable loading application symbol references at server startup. These symbols will be used to connect to AL Environment.
Hope you like this article and it helps you in upgrading data to Business Central.
Regards,
Saurav Dhyani
Thanks, Saurav! Very helpful, as usual.
ReplyDeleteWelcome @Justin.
DeleteI am trying to upgrade a NAV2016 Cum 3 database to 365BC Spring Cum 4 database.
ReplyDeleteI follow the MS description & your blog explanation as found here,
https://docs.microsoft.com/en-us/dynamics365/business-central/dev-itpro/upgrade/upgrading-the-data#UploadLicense
https://saurav-nav.blogspot.com/2018/10/msdyn365bc-data-upgrade-to-microsoft.html
Everything works fine until Task 12, Synchronization. It runs for a short while and then ends with the following error:
"Sync-NAVTenant : A dead connection cannot be brought back to the livings"
Database size is 85GB. It should not be a SQL command timeout because I was increased it.
I have tried the process on four different machines and get the same result. Using SQL Server 2014.
The NAV2016 database works fine and operational. I can compile all objects and synchronize before I start the upgrade.
Do you have any ideas?
Thats New @Malith Radrigo,
DeleteTwo things i will suggest -
1. Use Commit per table and then check can you replicate issue. (may have to run sync tenant multiple times).
2. Try Running Debugger before starting Sync Process and see if it stops in a point of code.
Is this command appropriate to run the commit per table?
Delete'Sync-NAVTenant -ServerInstance BC140 -CommitPerTable'
Hi @Malith,
DeleteYes its ok.
What commit per table does is after one table sync happens in sql it commits that transaction. So if it breaks after 150 tables next time you run sync it will start with table number 151.
Hi Saurav,
ReplyDeleteI converted a NAV 2015 db to BC following your steps.
But I did not run the data upgrade process. Can it happen any issues?
thanks.
Hi @Madhawa,
DeleteI dont think so but i dont understand reason behind doing this?
Hi Saurav,
DeleteAfter the upgrade the consumption posting is very slow.
if any reason for this?
thanks
If its only Consumption you can drill down more to identify where the problem is.
DeleteAs code base is of 2015 it should work same as before upgrade.
Hi Saurav,
ReplyDeleteI did an upgrade from NAV2015 to BC following your steps.
But I did not run the data upgrade process. Can it happen any issue from this?
thanks
Not exactly. Currently you are using BC Executable with NAV 2015 code. Its called as Technical conversion / Platform upgrade.
DeleteBut in your next upgrade you will have to do a migration from NAV 2015 to future. Your data still have schema of NAV 2015.
Hi Saurav,
ReplyDeleteAfter the upgrade, sometimes consumption posting is very slow. Then the other users can't post that item led. Entry table is locked. If you have any idea?
thanks
Hi saurav, after launching sync process, it hangs on table 957 and this step alone increases the size of database log by the size of 60Go.
ReplyDeletei don't know what the problem is?
thank for you precious help
The upgrade is from 2016 to BC140.
Hi Saurav really your Publish Post are Positive Value in word Business central Like author autor , so i have one question because moving from BC130 to BC190 the Latest Build , how can upgrade juste data and running with basic System.app , all standard extension , after i publish my Customization Apps (its BC140 turn into BC190) .
ReplyDeleteCan you Give me all script or Steps for
Thank you
Hi karimo,
DeleteThanks for the comment.
Can you please explain the issues via email - postsaurav@gmail.com.
Really helpful :) Thanks for updating......
ReplyDeletehelpful :) Thanks
ReplyDeleteGreat to hear that you liked the content.
DeleteGood Job Sir
ReplyDeleteGreat to hear that you liked the content.
Delete