NAV 2013 R2 Windows Client & Web Client with NavUserPassword - Configuring the Credential Type for Microsoft Dynamics NAV Server.
Hi all,
This is third post in this series. Please make sure that you have read all the Previous post before you start reading this post.
All the post related to this series can be found in Introduction Post.
Let's move ahead from where we left yesterday.
31. We need a user that we will use to Run the Windows and web client.
32. Let's Open windows client and create a user.
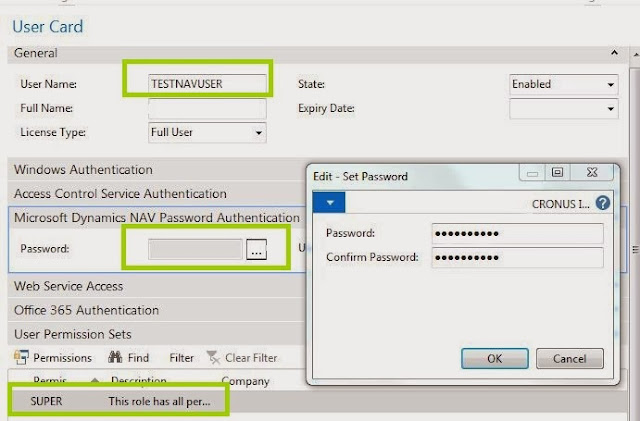
33. Provide a UserName (TESTNAVUSER), assign Role(For me its SUPER) and Provide a Password (TestNAV123).
34. Click OK, it will give you a warning. Click YES.
Changes in Service Tier -
35. Close windows client.
36. Open Microsoft Dynamics NAV 2013 R2 Administration.
37. Create a New Service for Testing (Say TestNAVUSerName).
For New Services i.e TestNAVUSerName following Port Numbers are used (We will require these Port During Configuration of Clients)-
Management Services port - 10045
Client Services Port - 10046
SOAP Services Port - 10047
OData Services Port - 10048
* We are doing this so that our existing setup should work in case there is an issue with what we are trying.
38. Edit the Service and change -
a) Credential Type to NavUserPassword.
b) Certificate Thumbprint as shown at the end of Post 2.

39. Save and Restart the Service.
40. It should be up and Running.
In Next Post we will see what need to be changed in client (RTC and Web) for using NAVUSerPassword.
Regards,
Saurav Dhyani
This is third post in this series. Please make sure that you have read all the Previous post before you start reading this post.
All the post related to this series can be found in Introduction Post.
Let's move ahead from where we left yesterday.
31. We need a user that we will use to Run the Windows and web client.
32. Let's Open windows client and create a user.
33. Provide a UserName (TESTNAVUSER), assign Role(For me its SUPER) and Provide a Password (TestNAV123).

34. Click OK, it will give you a warning. Click YES.
Changes in Service Tier -
35. Close windows client.
36. Open Microsoft Dynamics NAV 2013 R2 Administration.
37. Create a New Service for Testing (Say TestNAVUSerName).
For New Services i.e TestNAVUSerName following Port Numbers are used (We will require these Port During Configuration of Clients)-
Management Services port - 10045
Client Services Port - 10046
SOAP Services Port - 10047
OData Services Port - 10048
* We are doing this so that our existing setup should work in case there is an issue with what we are trying.
38. Edit the Service and change -
a) Credential Type to NavUserPassword.
b) Certificate Thumbprint as shown at the end of Post 2.

39. Save and Restart the Service.
40. It should be up and Running.
Regards,
Saurav Dhyani
Comments
Post a Comment