Hi all,
Most of us know it but i still would like to have a post on this because a keep on getting questions about it.
This post is just list down the steps for creating a new service in NAV 2013 R2. So if you know it you don't need to read ahead.
Steps to Create a New Service-
1. Open Microsoft Dynamics NAV Administration.
2. From Left Hand Menu Right Click Microsoft Dynamics NAV (Local) and Select Add Instance.

3. A new window will Popup with Title Server Instance. In this window you need to specify Following Parameters.
a) Server Instance (Name of Service)
b) Port Numbers from Management Services , Client Services (Used by all the clients to connect), SOAP Services (Read & Write Web Service) & ODATA Services (Read Web Service).
c) Login Account (Account used to Run the Service - Default Value NETWORK SERVICE)
You can specify any valid Port Number which is currently no in use in your system. The Default Ports are 7045, 7046, 7047 and 7048 Respectively.
For the Demo i am using Port No. 10045, 10046, 10047 and 10048 respectively as shown below.

4. Once i click ok the service is created and it will be stopped by default. What the tool did is -
" It Creates the copy of standard service and change the port numbers as specified in step 3"
5. we may require to point this service on a different server or a different database or May be both.
6. Click on Service from left hand panel, the details of services will be available in center panel as shown below.
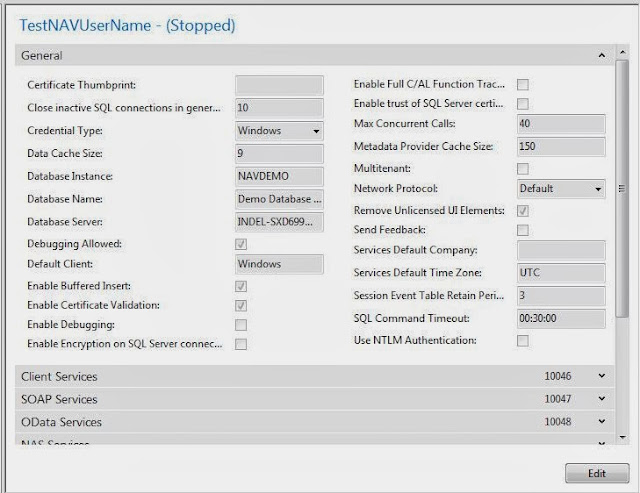
From General Tab you can change the Database Name, Database Server and Database Instance. For Changing anything you need to select Edit which is placed at Right Below in Screen.
If you want to change the Login Account, then From Action Pane in Right Select Login Account and Edit the setting as per your requirement.

I hope you will now be able to create services as per your requirement.
Thanks & Regards,
Saurav Dhyani
saurav-nav.blogspot.in
Comments
Post a Comment