#msdyn365bc - Test Base64 Conversion via Web Services?

Hi Readers,

As discussed in last article we will Test customization using web services that we developed this week for integration from #msdyn365bc or #MSDynNAV.

If you want to see other articles in this series please refer here.

We will need to use same website to Test this process. This process will require a Base64 Value for testing. 

Open Business Central and search and open Web Services Page.

Click on New, and add a new page (50002) that we created for API and name it attachmentwebservices.


Copy OData V4 URL. This URL we will use to Post data in Business Central.

If you have read the first article on this series, please download and Install Postman.

In Postman client, select New.

Let's try testing is GET Process. Select Get and then Paste URL in the field "Enter Request URL".

Then Select Authorization tab and select the appropriate Type of authentication. For Docker Environment I will select Basic Auth and key in username and password that is required for client connection.

Then Click Send and you will see Response in below tab as shown below. The Response will have fields which are available in page which in our case will have - 

  • Id  will have the ID stored in the record.
  • code  will have the code stored in the record.
  • Extension will have the file extension for the file that use input during add record.
  • outbit64value  will have the converted Bit64 value for the attachment stored in database.

In this case we will try to import/upload a pdf file. For that first we will get the bit64 value using Bit64 Guru website (as shown below).

We will copy the Bit64 value for the PDF and then open Postman again.

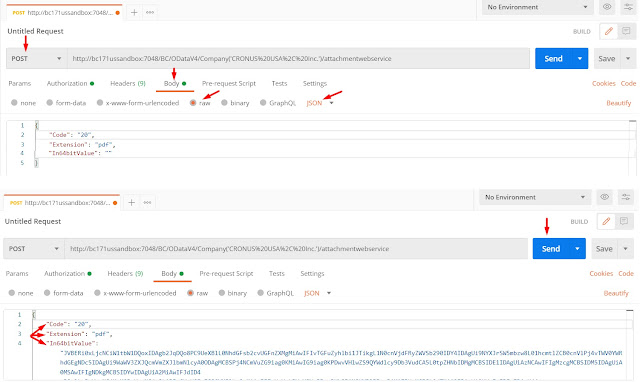
Choose - 

  • Post. to add new record.
  • Request URL to add URL that we have from webservice page.
  • Select Body - raw - Json to add details of Record. 
Add Values between { } with value pair combination like (as shown below) -

{
 "code": "",             --  Unique record Identifier.
"Extension": "",      --  File Extension in this case pdf.
"In64bitvalue" : ""  --  Bit 64 value that we copied from Base64 Guru website.
}

Then Click on Send and you will see a response back.


Open API Page in Business Central and we will see record added in business Central.


If you want to use webservice then you can continue with this. We will delete webservice that we created earlier as for next article we will not require that.


In next article we will start testing the customization using API.

If you would like to access the source code please refer GitHub.

Stay Tuned. Let me know your views as comment to this article.

Regards,
Saurav Dhyani

Comments

Popular posts from this blog

VIEW SERVER STATE permission on SQL Server?

Hi all, Sometime While trying to Login into a database we face an error message as shown below. --------------------------- Microsoft Dynamics NAV Classic --------------------------- You cannot start Microsoft Dynamics NAV Classic because you do not have the VIEW SERVER STATE permission on SQL Server. Contact your system administrator. --------------------------- OK    ---------------------------

NAV 2013 R2 - Cumulative update 12 Released.

Hi all, Please find below the details of  Cumulative Update 12 released for Microsoft Dynamics NAV 2013 R2. Title - Cumulative Update 12 for Microsoft Dynamics NAV 2013 R2 Build No. - 38053 Release Date - October, 2014 Local Version Included - AU, AT, BE, CH, DE, DK, ES, FI, FR, IS, IT, NA, NL, NO, NZ, SE, UK, RU Download Link Note: Implementing this cumulative update will require a database conversion unless you have already implemented update rollup 5.

NAV 2013 Upgrade Part III - Data Upgrading.

Hi all, As per agenda we need to discuss the data upgrade in NAV 2013. The process is similar to what used to be till NAV 2009 R2 but with some changes. Let's start the process. Remember -  1) You can only upgrade a database to NAV 2013 from NAV 2009 SP1 / R2 SQL Only. 2) The Synchronization of users with SQL Server is no more required.