
#msdyn365bc - Export Multiple Sheet To Excel Report.

Hi Readers,

This is one of the question that I received as comment to Previous article.

In this article we will develop a report which can extract data from multiple Tables.

I am not going into details as its already discussed in last article. You can refer that article here.

For Demo, I will be export few fields from customer & vendor table to Excel.

Let's start by creating a New Processing Only Report for Exporting Data to Excel.

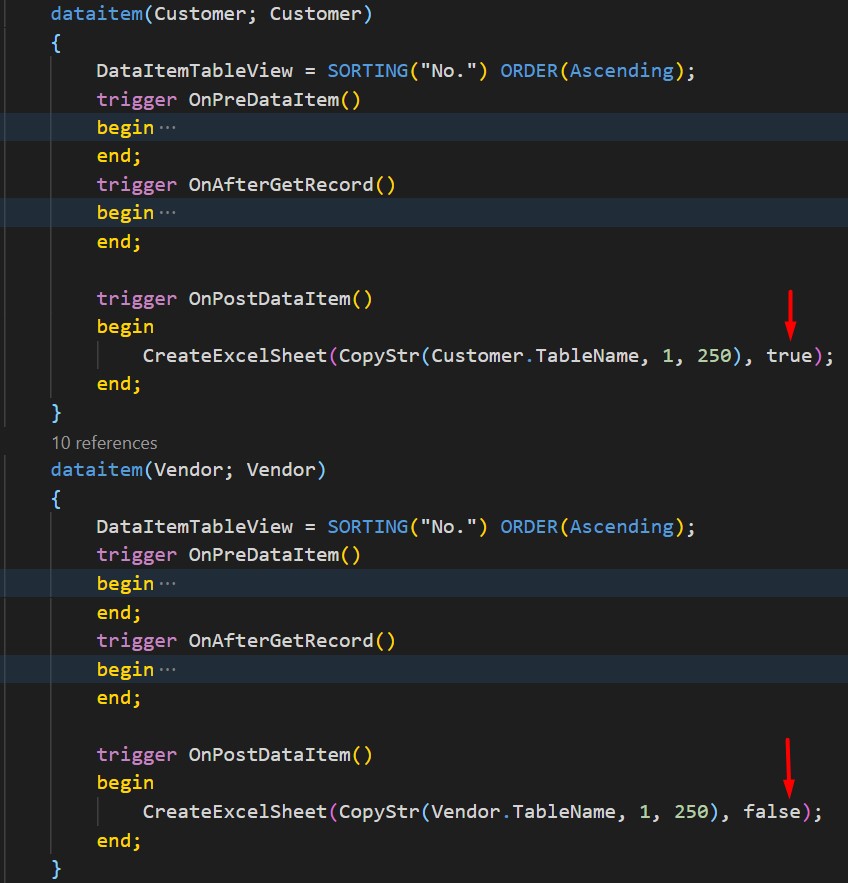
Next we will add two data items Customers and Vendors. Both Data Item will call function to Create Excel Header and Excel Body.


Below are the function, which are referenced in data items for Generating Excel Header.

Next is the set of Functions to Generate Excel Body.

To Add Multiple Sheet, I will change CreateExcelBook Function and also Add New Function CreateExcelSheet.

CreateExcelSheet - will require two parameters - 

  • SheetName - This parameter will have the Sheet Name in Excel File.
  • NewBook - Boolean. Based on this Boolean a New Book will be Created.  When this function will be called from first  Dataitem it will be set to true and for all other data items it will be set as false.   
CreateExcelBook, will remove other code lines to create Book and Write Sheet. And will only have code to CloseBook and Open Excel.

In the End, You can call this new function from OnPostData Item of all data items in reports.
Let's Publish and Run the Report and see data in Excel.


Hope you like the article. Let me know your views in article comments.

You can also download the source code from GitHub.

Stay Connected and keep suggesting what you would like me to write about.

Regards,
Saurav Dhyani
www.sauravdhyani.com

Comments

Popular posts from this blog

Microsoft Dynamics NAV 2016 - How to Configure Phone Client.

Hi All, In this article we will discuss how we can connect Microsoft Dynamics NAV 2016 with New Client Launched i.e. Phone Client. This Article Contain Steps for a Android Phone as I have Only Android Phone. I am doing it having all tiers on my windows 8 machine, steps remain same for multiple servers but issues might be different. What we Need (Other what we discuss in this article) -  The Service Tier should be on Public IP . Some of the Data-card does not Provide you Public IP. check it for sure.

How to Set Up NavUserPassword Authentication in Business Central.

Hi Readers, In this article we will discuss steps to Setup NAVUserPassword in Business Central on-prem. NavUserPassword is an authentication method that's handled by Business Central Server, but isn't based on Windows users or Active Directory. Each user is set up with a username and password that's configured inside Business Central only. The user is prompted for username/password credentials when they start the client. #msdyn365bc, #credentialtype

MSDYN365BC - Data Upgrade To Microsoft Dynamics 365 Business Central on premises.

Hi Readers, We have already talked about the number of steps for upgrading to Business Central on Premises from different NAV versions. After that article, I received multiple requests for an article which list down steps for Data Migration. In this article, we will discuss steps of data migration to MSDYN365BC (on-Prem) from NAV 2017. For this article, I am considering a Cronus Demo Database without any customization. For an actual upgrade project, we will have to complete object merge using compare and Merge process. After the Merge Process, the next step is data migration. Let's discuss those steps. Direct Upgrade to Microsoft Dynamics 365 Business Central (on-Prem) is from following versions - 1. NAV 2015. 2. NAV 2016. 3. NAV 2017. 4. NAV 2018.