Hi Readers,

Today I would spend some time discussing how to use Rapid start for Implementation or Re-implementation.
I can be completely wrong, but I think this is the process that we follow during this kind of projects.
Your thoughts after reading this article will be appreciated. It can help or it can motivate me to write more stuff about these kinds of issues or solutions.
How we start these kinds of Projects -




Today I would spend some time discussing how to use Rapid start for Implementation or Re-implementation.
I can be completely wrong, but I think this is the process that we follow during this kind of projects.
Your thoughts after reading this article will be appreciated. It can help or it can motivate me to write more stuff about these kinds of issues or solutions.
How we start these kinds of Projects -
- We start with a completely blank database (only objects).
- We create a new company that we will use to start setting up masters.
- Once we are finalized and customer confirmed we want to move those setup/master database to a new database for the Project Go-Live.
The Problem actually starts in Step 3 that we don't know how to copy those selected data between a database or to a new company. This article we will discuss about that step and how easy to achieve this starting NAV 2013 R2 onwards.
This article applies till latest version #MSDYN365BC.
In the company where you have setup all master data, let's follow these steps -
1. Open Configuration Packages from Departments/Administration/Application Setup/RapidStart Services
2. Create a new package as shown below.

3. Now Open Configuration Worksheet from Departments/Administration/Application Setup/RapidStart Services.
4. From Action Ribbon, Select Get Tables and apply the filter as per your requirements. This will load all the tables in the worksheet as shown below.

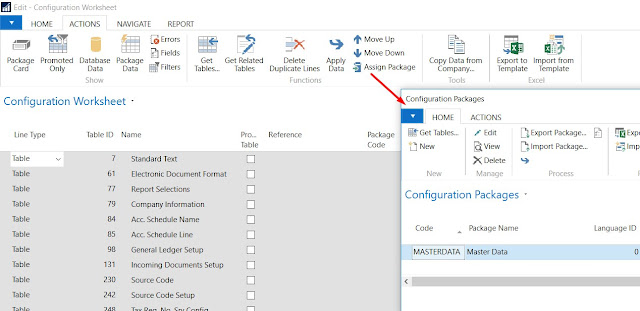
5. Delete rows that you don't require. Select all rows and then From Action Ribbon, Select Assign package. This action will assign the package to all selected rows.

6. This will also add those tables in the configuration package created in step 2 as shown below.

7. Export the package as shown below.

Now open another company (new Blank company) production company, let's follow these steps -
1. Navigate and open Configuration Packages from Departments/Administration/Application Setup/RapidStart Services.
2. Import package exported in Step 7, as shown below.

3. After imported select Apply Data to Transfer Data and it will apply data in that company.

Other Way -
If you know the table number/name that you want to copy data from a company then follow these steps.
1. Open Configuration Worksheet from Departments/Administration/Application Setup/RapidStart Services.
2. Add Tables in the worksheet that you want to copy from another company as shown below, select all rows in the page. Then Select Copy Data From Company Action in Action Group.

3. Select all rows in the page and then Select the company from where you want to copy data and select Copy Data action from the ribbon.

4. This action will copy all the data in the new company.

Hope it helps.
Regards,
Saurav Dhyani
Comments
Post a Comment