Hi all,
In this post we will see how we can configure SQL Server Reporting Services.
1. Open Reporting Services Configuration Manager from -
Start Menu -> Microsoft SQL Server -> Configuration Services as shown below.

* If you don't see the Reporting Services Configuration here, you need to install it first from SQL Server DVD.
2. You need to specify the server name for which you want to configure the Reporting Services.
* By Default it shows the Local SQL Server Name.

3. Click Connect after specifying the Server Name. Hit Apply in the Next window as shown below.
By Configuration Web Service URL you will get the Base URL for All the Report that you publish.

4. Next is Database.
SSRS Creates Two Database, these databases are used to store the URL and Report Defination Uploaded by you on server.


5. Click Next on New Database and provide a name of the database.
* Default Name SQL Reporting Database.


6. Once you click Finish the Database is created on SQL Server Selected in step 1.

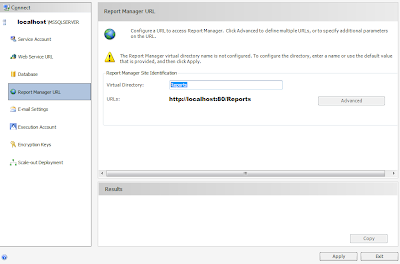
7. Next you need to set the Report Manager URL, where you can upload, modify and delete SSRS Reports.
This URL will also provide you access to the Security sections of the SSRS Report, where you can specify rights to users.
8. If you want to configure the Auto Email part, then u can setup that on E-mail settings.
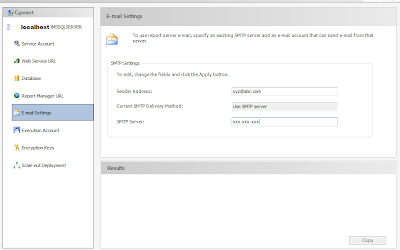
Once done the SSRS Reporting server is deployed.
In Next post in this series we will see how to check the Deployed Reporting Server and conman issues.
Regards,
Saurav Dhyani
saurav-nav.blogspot.in
In this post we will see how we can configure SQL Server Reporting Services.
1. Open Reporting Services Configuration Manager from -
Start Menu -> Microsoft SQL Server -> Configuration Services as shown below.

* If you don't see the Reporting Services Configuration here, you need to install it first from SQL Server DVD.
2. You need to specify the server name for which you want to configure the Reporting Services.
* By Default it shows the Local SQL Server Name.

3. Click Connect after specifying the Server Name. Hit Apply in the Next window as shown below.
By Configuration Web Service URL you will get the Base URL for All the Report that you publish.

4. Next is Database.
SSRS Creates Two Database, these databases are used to store the URL and Report Defination Uploaded by you on server.


5. Click Next on New Database and provide a name of the database.
* Default Name SQL Reporting Database.


6. Once you click Finish the Database is created on SQL Server Selected in step 1.

7. Next you need to set the Report Manager URL, where you can upload, modify and delete SSRS Reports.
This URL will also provide you access to the Security sections of the SSRS Report, where you can specify rights to users.

8. If you want to configure the Auto Email part, then u can setup that on E-mail settings.

Once done the SSRS Reporting server is deployed.
In Next post in this series we will see how to check the Deployed Reporting Server and conman issues.
Regards,
Saurav Dhyani
saurav-nav.blogspot.in
Comments
Post a Comment