Hi all,
I was just browsing NAV 2013 during which i figured out a efficient way of entering data in NAV 2013 - QUICK ENTRY.
Let's see how to use it.
1. Open any Page, says Sales invoice Page.
2. Navigate to Customize this page as shown below.

Click on Fast Tab and select the Lines Fast Tab. Select Customize Fast Tab as shown below.

Click on Choose Column and from the right hand side panel, click on each field. You will find that every field have Quick Entry Checked as shown below.

Now lets change this as per our requirement.
My Requirement is, once i select Type and No. the cursor should point to fields as per the list below -
Location code, Quantity, Line Discount %.
So i will unchecked the quick entry on -
Description, UOM code, Unit Price, Line Amount.

Hit OK twice and page will get re-opened.
Now try creating lines, remember for applying navigation as per our requirement we need to Click Enter instead of Tab after filling value in field.
Once i enter type and no. - After clicking Enter my cursor points to Location instead of description.

I think this feature will provide an easy way to Enter Data.
REMEMBER - HIT ENTER INSTEAD OF TAB FOR NAVIGATION.
Regards,
Saurav Dhyani
http://saurav-nav.blogspot.com/
I was just browsing NAV 2013 during which i figured out a efficient way of entering data in NAV 2013 - QUICK ENTRY.
Let's see how to use it.
1. Open any Page, says Sales invoice Page.
2. Navigate to Customize this page as shown below.

Click on Fast Tab and select the Lines Fast Tab. Select Customize Fast Tab as shown below.

Click on Choose Column and from the right hand side panel, click on each field. You will find that every field have Quick Entry Checked as shown below.
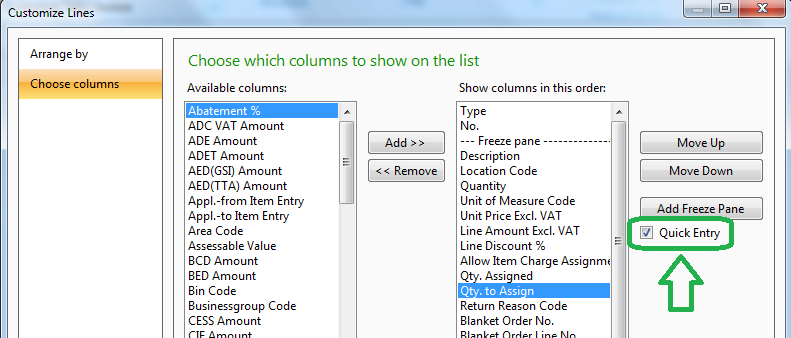
Now lets change this as per our requirement.
My Requirement is, once i select Type and No. the cursor should point to fields as per the list below -
Location code, Quantity, Line Discount %.
So i will unchecked the quick entry on -
Description, UOM code, Unit Price, Line Amount.

Hit OK twice and page will get re-opened.
Now try creating lines, remember for applying navigation as per our requirement we need to Click Enter instead of Tab after filling value in field.
Once i enter type and no. - After clicking Enter my cursor points to Location instead of description.

I think this feature will provide an easy way to Enter Data.
REMEMBER - HIT ENTER INSTEAD OF TAB FOR NAVIGATION.
Regards,
Saurav Dhyani
http://saurav-nav.blogspot.com/
Comments
Post a Comment