MSDYN365BC - Publish Extension Error - NetFx40_LegacySecurityPolicy is enabled and must be turned off.
Hi Readers,
 I hope till this time everyone would have tried creating and publishing extension on Business Central
on-Prem Version.
If you haven't then start and learn how to do that. If you already started doing this you might be getting an error message while publishing extension.
In this article, we will discuss how to fix NetFx40_LegacySecurityPolicy issue.
Error Message -
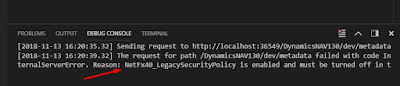
The request for path /DynamicsNAV130/dev/metadata failed with code InternalServerError.
Reason: NetFx40_LegacySecurityPolicy is enabled and must be turned off in the Microsoft.Dynamics.Nav.Server.exe.config file.

To Fix this issue -
1. Open Notepad as Administrator.
Navigate to C:\WINDOWS\system32.
Right click on Notepad and select Run as administrator.

2. Open "Microsoft.Dynamics.Nav.Server.exe" file from Service Folder as shown below.

3. Change the NetFx40_LegacySecurityPolicy parameter from true to false. Save the file.
 4. Restart NAV Service.
5. Try publishing extension again, it should get published successfully.

Hope you find the information useful.
Regards,
Saurav Dhyani.
www.sauravdhyani.com
 I hope till this time everyone would have tried creating and publishing extension on Business Central
on-Prem Version.
If you haven't then start and learn how to do that. If you already started doing this you might be getting an error message while publishing extension.
In this article, we will discuss how to fix NetFx40_LegacySecurityPolicy issue.
Error Message -
The request for path /DynamicsNAV130/dev/metadata failed with code InternalServerError.
Reason: NetFx40_LegacySecurityPolicy is enabled and must be turned off in the Microsoft.Dynamics.Nav.Server.exe.config file.

To Fix this issue -
1. Open Notepad as Administrator.
Navigate to C:\WINDOWS\system32.
Right click on Notepad and select Run as administrator.


3. Change the NetFx40_LegacySecurityPolicy parameter from true to false. Save the file.

5. Try publishing extension again, it should get published successfully.

Hope you find the information useful.
Regards,
Saurav Dhyani.
www.sauravdhyani.com
Awesome It really works.
ReplyDeleteGreat to hear that @Rishi.
DeleteHi Saurav,
ReplyDeleteI faced this problem and carried out the steps mentioned in your blog. I am glad it has worked and the NetFX error got resolved.
Many thanks for posting this.
Krupesh
Great to hear that sir.
DeleteHi Saurav,
ReplyDeleteYour posts are always helpful. Thank You so much for the valuable info. The error got resolved.
Thanks once again.
Shikha
Great to hear that @Shikha.
DeleteHi Saurav,
ReplyDeleteI do not know where I would be without you. The knowledge that you share is always a huge help!
Thank you as always.
KT
Thanks KT for the kind words.
DeleteIt great to hear that i was able to help.
Hi Saurav there are implications of this change?
ReplyDeleteI Don't think as this problem does not exist in future versions.
Delete