Hi Readers,
I am back with steps to Create an SSL Certificate after so many e-mails from my readers.
The Reason behind having this as a separate article, because SSL Certificate is a pre-requisites for so many setups which will be seen in future.
** Make Sure -
1. This article list down steps for creating a certificate for Test / Demo Environment.
2. For Product Environment, Please purchase an SSL Certificate from the certification authority.
3. Please follow all steps as specified.
Keep a Safe Copy of Certificate thumbprint Generated in - Step D.
and Keep a Safe Copy of Certificate Generated in - Step I.
We will need it in future for setup and Configuration.
2. Create the Certificate.
a. Open PowerShell with the option As administrator. (Windows Powershell ISE)
b. Go to the directory where you saved the New-SelfSignedCertificateEx.ps1 file.
c. Run the following command: Import-Module .\New-SelfSignedCertificateEx.ps1.
** System may Prompt you for a confirmation message, select Run Once.

d. Then Run the following command -
New-SelfSignedCertificateEx –Subject “CN=<your site name>” –IsCA $true –Exportable –StoreLocation LocalMachine

Keep Safe Copy of Thumbprint, we will need in future.
Where -
<your site name> - Machine Name of the Server Running Microsoft Dynamics NAV Service Tier.
as shown below.

e. Manage the Certificate -
Open the mmc.exe.
Go to the File menu, and then choose Add/Remove Snap-in...
Select Certificates.
Choose Add.
Select the computer account.
Choose Finish and then OK.

f. Locate the certificate you just created in the personal/certificates folder.
> Name will be same as your service tier Machine.
> The Expiration Date Will be 1Y-2D (01 Year - 02 Days) for that certificate.
> Valid From 01 Day Before you create Certificate.

g. Assign Permission to Certificate -
Right Click Certificate.
From All Tasks Select Manage Private Keys.
Add Permission for the Account which is used to Run Dynamics NAV Services.

h. Copy the certificate To Trusted Root Certification Authorities.
Copy the Certificate from Personal / Certificate Node.
Paste the certificate into the Trusted Root Certification Authorities/Certificates folder.

I. Download the Certificate for Future Use -
Select the certificate, right-click and export the certificate.
Select the No, do not export the private key option.
Choose Next.
Select DER encoded binary x.509 (.cer).
Specify a location and filename and finish the wizard.
 Keep Safe Copy of Certificate, we will need in future.
Hope you all will be ready with your Certificates and Thumbprint. Let me know if any issues, but please please follow all steps as discussed.
Regards,
Saurav Dhyani
saurav-nav.blogspot.com
I am back with steps to Create an SSL Certificate after so many e-mails from my readers.
The Reason behind having this as a separate article, because SSL Certificate is a pre-requisites for so many setups which will be seen in future.
** Make Sure -
1. This article list down steps for creating a certificate for Test / Demo Environment.
2. For Product Environment, Please purchase an SSL Certificate from the certification authority.
3. Please follow all steps as specified.
Keep a Safe Copy of Certificate thumbprint Generated in - Step D.
and Keep a Safe Copy of Certificate Generated in - Step I.
We will need it in future for setup and Configuration.
1. Download Self-signed certificate generator (PowerShell) from Technet.
2. Create the Certificate.
a. Open PowerShell with the option As administrator. (Windows Powershell ISE)
b. Go to the directory where you saved the New-SelfSignedCertificateEx.ps1 file.
c. Run the following command: Import-Module .\New-SelfSignedCertificateEx.ps1.
** System may Prompt you for a confirmation message, select Run Once.

d. Then Run the following command -
New-SelfSignedCertificateEx –Subject “CN=<your site name>” –IsCA $true –Exportable –StoreLocation LocalMachine

Keep Safe Copy of Thumbprint, we will need in future.
Where -
<your site name> - Machine Name of the Server Running Microsoft Dynamics NAV Service Tier.
as shown below.

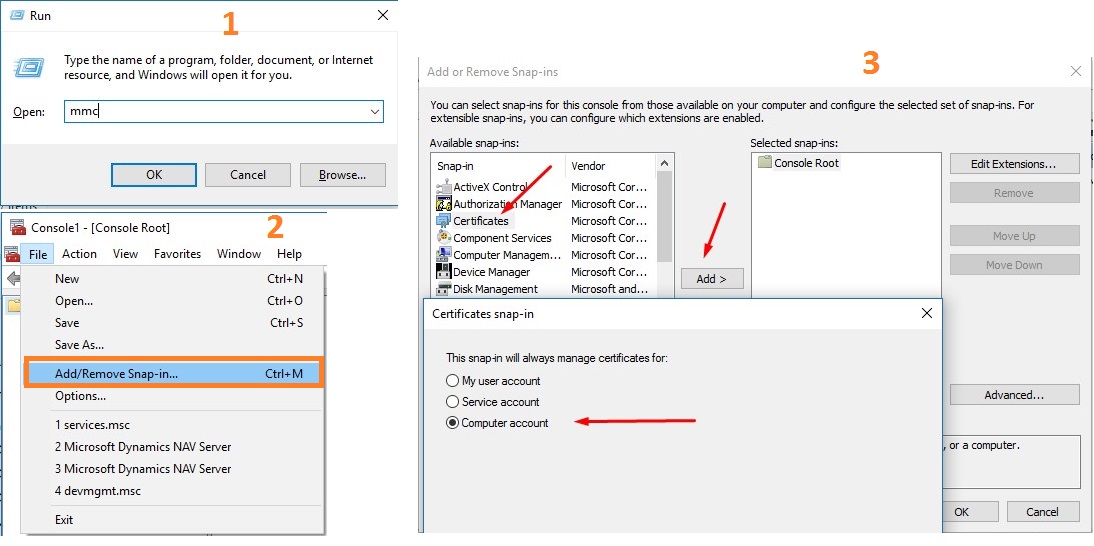
e. Manage the Certificate -
Open the mmc.exe.
Go to the File menu, and then choose Add/Remove Snap-in...
Select Certificates.
Choose Add.
Select the computer account.
Choose Finish and then OK.
f. Locate the certificate you just created in the personal/certificates folder.
> Name will be same as your service tier Machine.
> The Expiration Date Will be 1Y-2D (01 Year - 02 Days) for that certificate.
> Valid From 01 Day Before you create Certificate.

g. Assign Permission to Certificate -
Right Click Certificate.
From All Tasks Select Manage Private Keys.
Add Permission for the Account which is used to Run Dynamics NAV Services.

h. Copy the certificate To Trusted Root Certification Authorities.
Copy the Certificate from Personal / Certificate Node.
Paste the certificate into the Trusted Root Certification Authorities/Certificates folder.

I. Download the Certificate for Future Use -
Select the certificate, right-click and export the certificate.
Select the No, do not export the private key option.
Choose Next.
Select DER encoded binary x.509 (.cer).
Specify a location and filename and finish the wizard.

Hope you all will be ready with your Certificates and Thumbprint. Let me know if any issues, but please please follow all steps as discussed.
Regards,
Saurav Dhyani
saurav-nav.blogspot.com
Most wonderfull Article, Thanks for sharing!
ReplyDeleteHow to Install an SSL Certificate On WordPress?